Overview
In this tutorial, I won't cover Shopify Rollouts in detail. Instead, I'll focus on a practical use case that many Shopify merchants can benefit from.
Rollouts are a powerful feature that lets store owners automate and schedule changes to their stores.
I'll show you how to use Rollouts to schedule a theme swap and automatically publish it at a specific date and time.
Assumptions
Before moving to the next step, make sure you have at least two themes installed on your store.
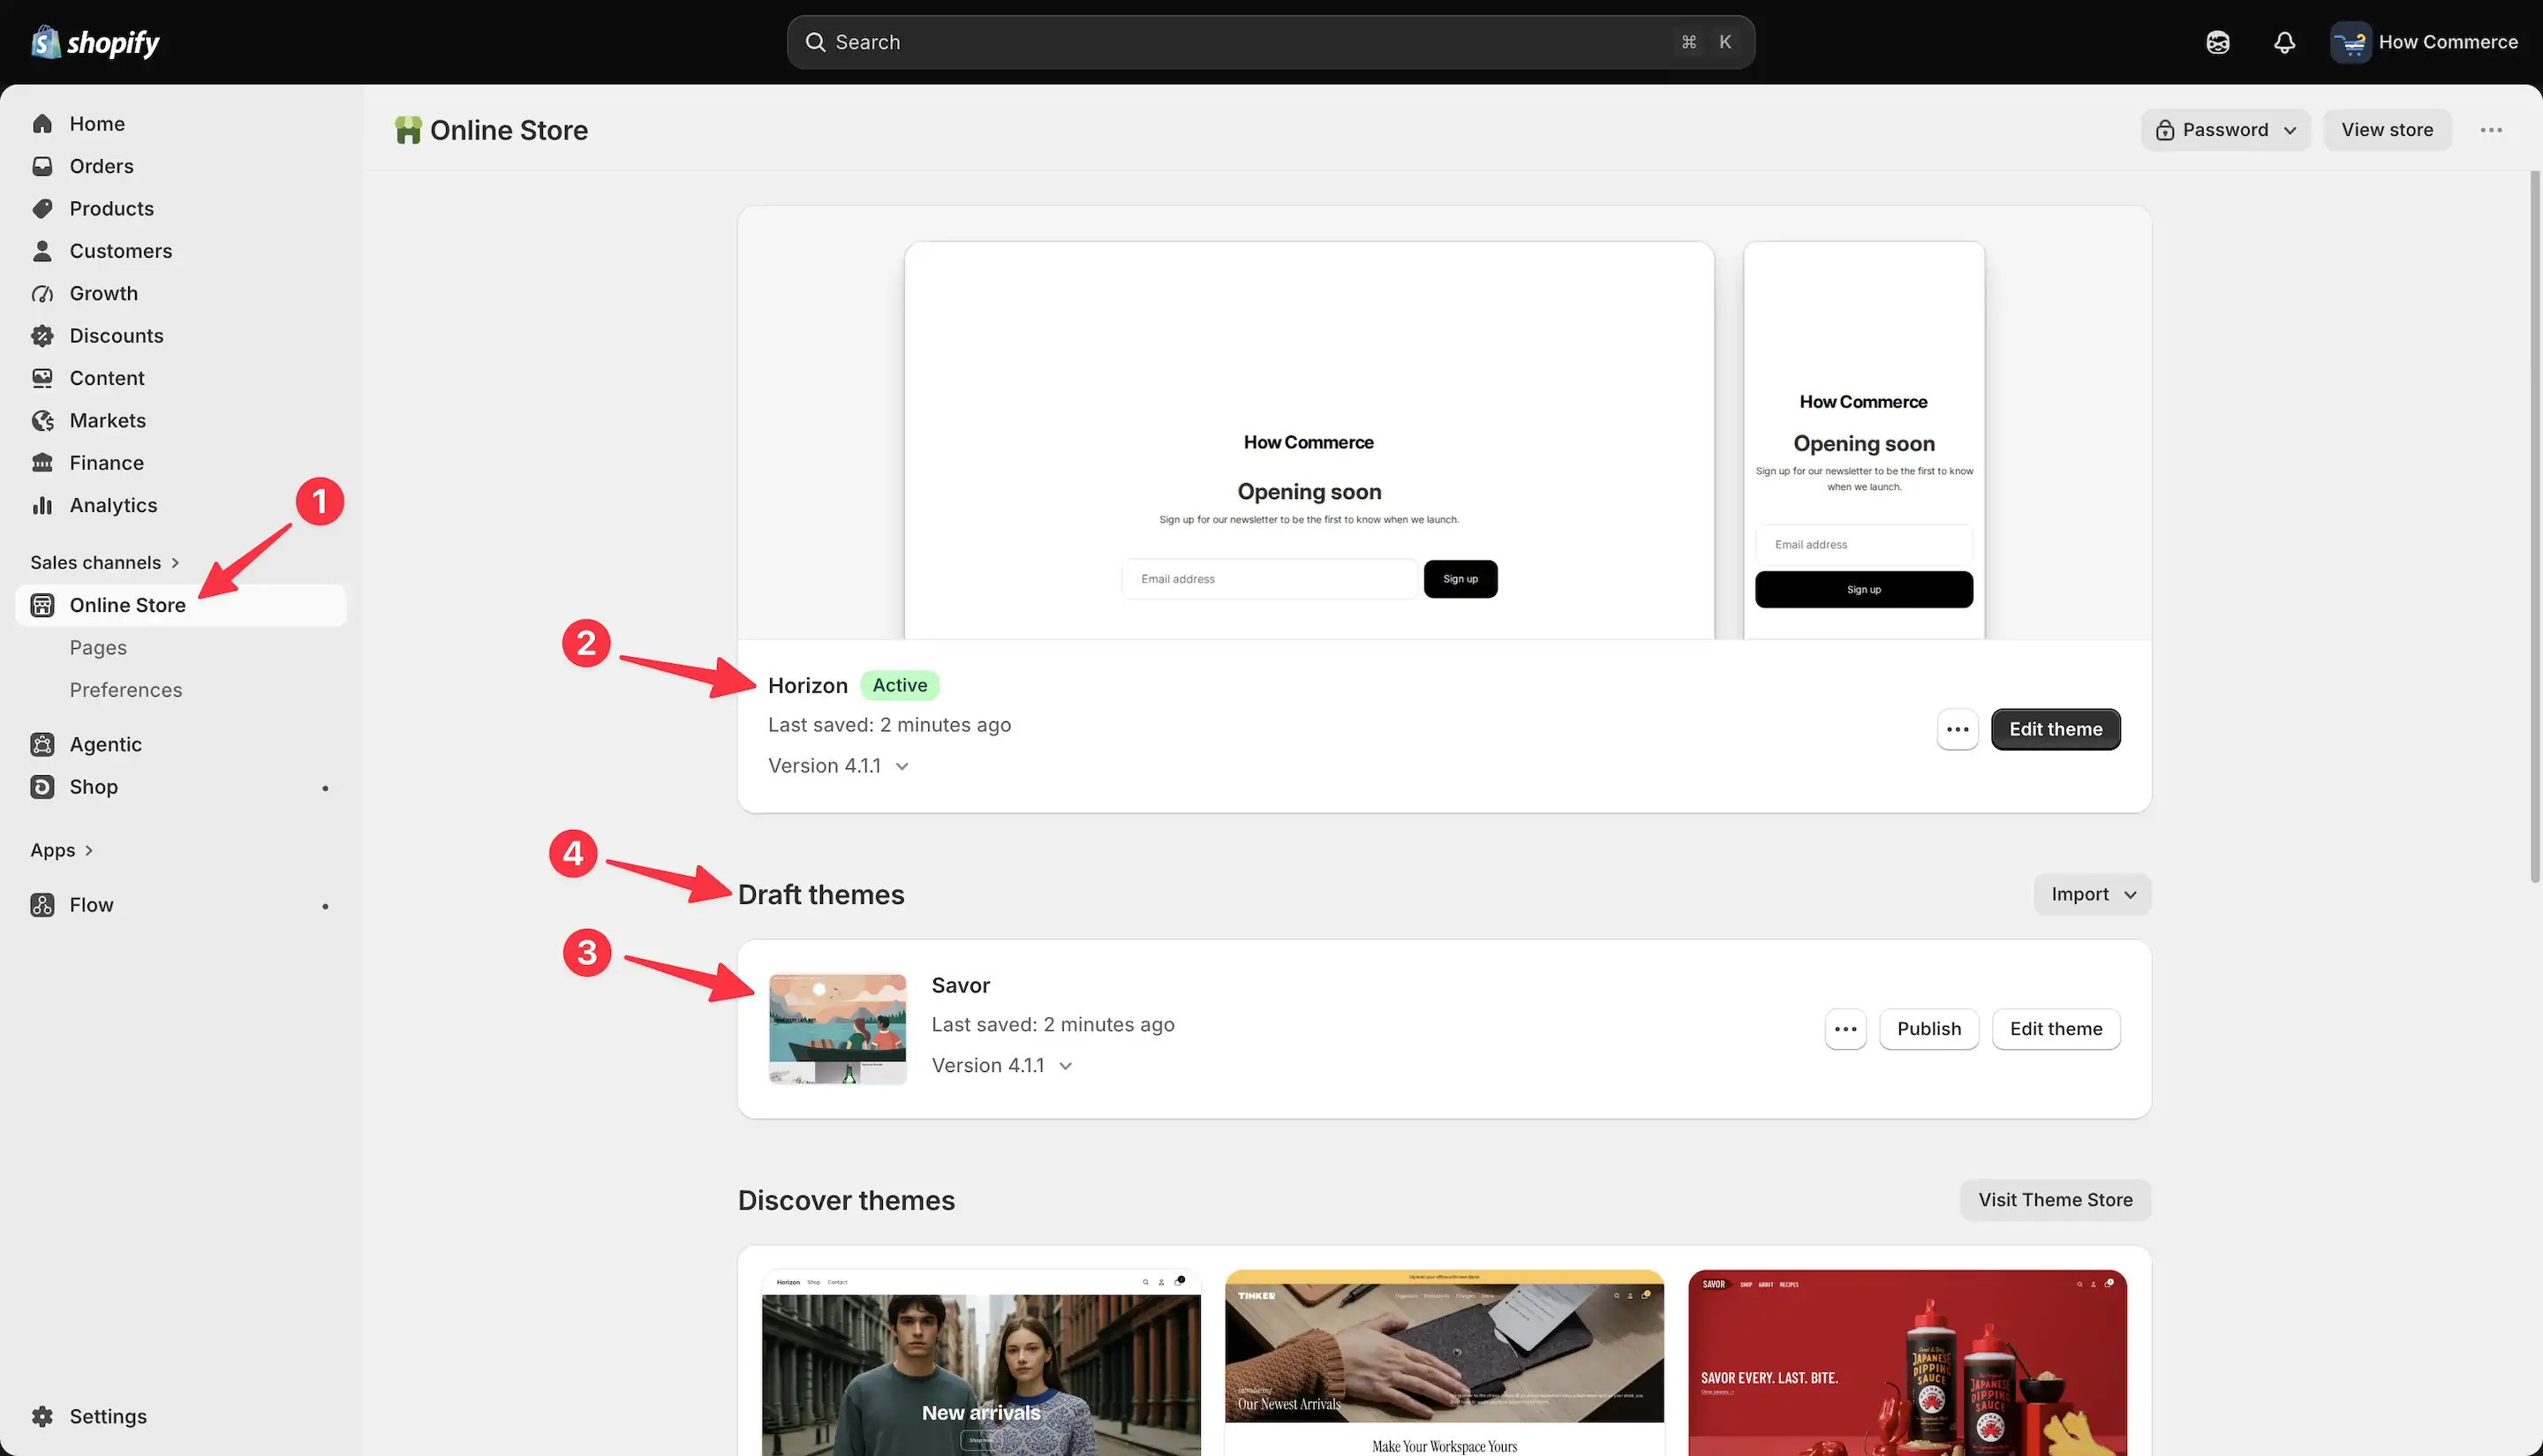
Go to the Online Store (marked with 1 in the image below). On this page, you can view all the themes installed on your store.
You should have at least one published theme (marked with 2 in the image below) and another theme (marked with 3 in the image below) in the Draft themes section (marked with 4 in the image below).
This requirement is important because a theme swap needs both an active theme and a second theme to replace it. Since Shopify requires every store to have a published theme, having only one theme leaves nothing to swap.
For this tutorial, you'll need a minimum of two themes: one published theme and one draft theme that will be used in the rollout.
Rollouts support only Online Store 2.0 themes and don't include Liquid template changes.
Create a new rollout
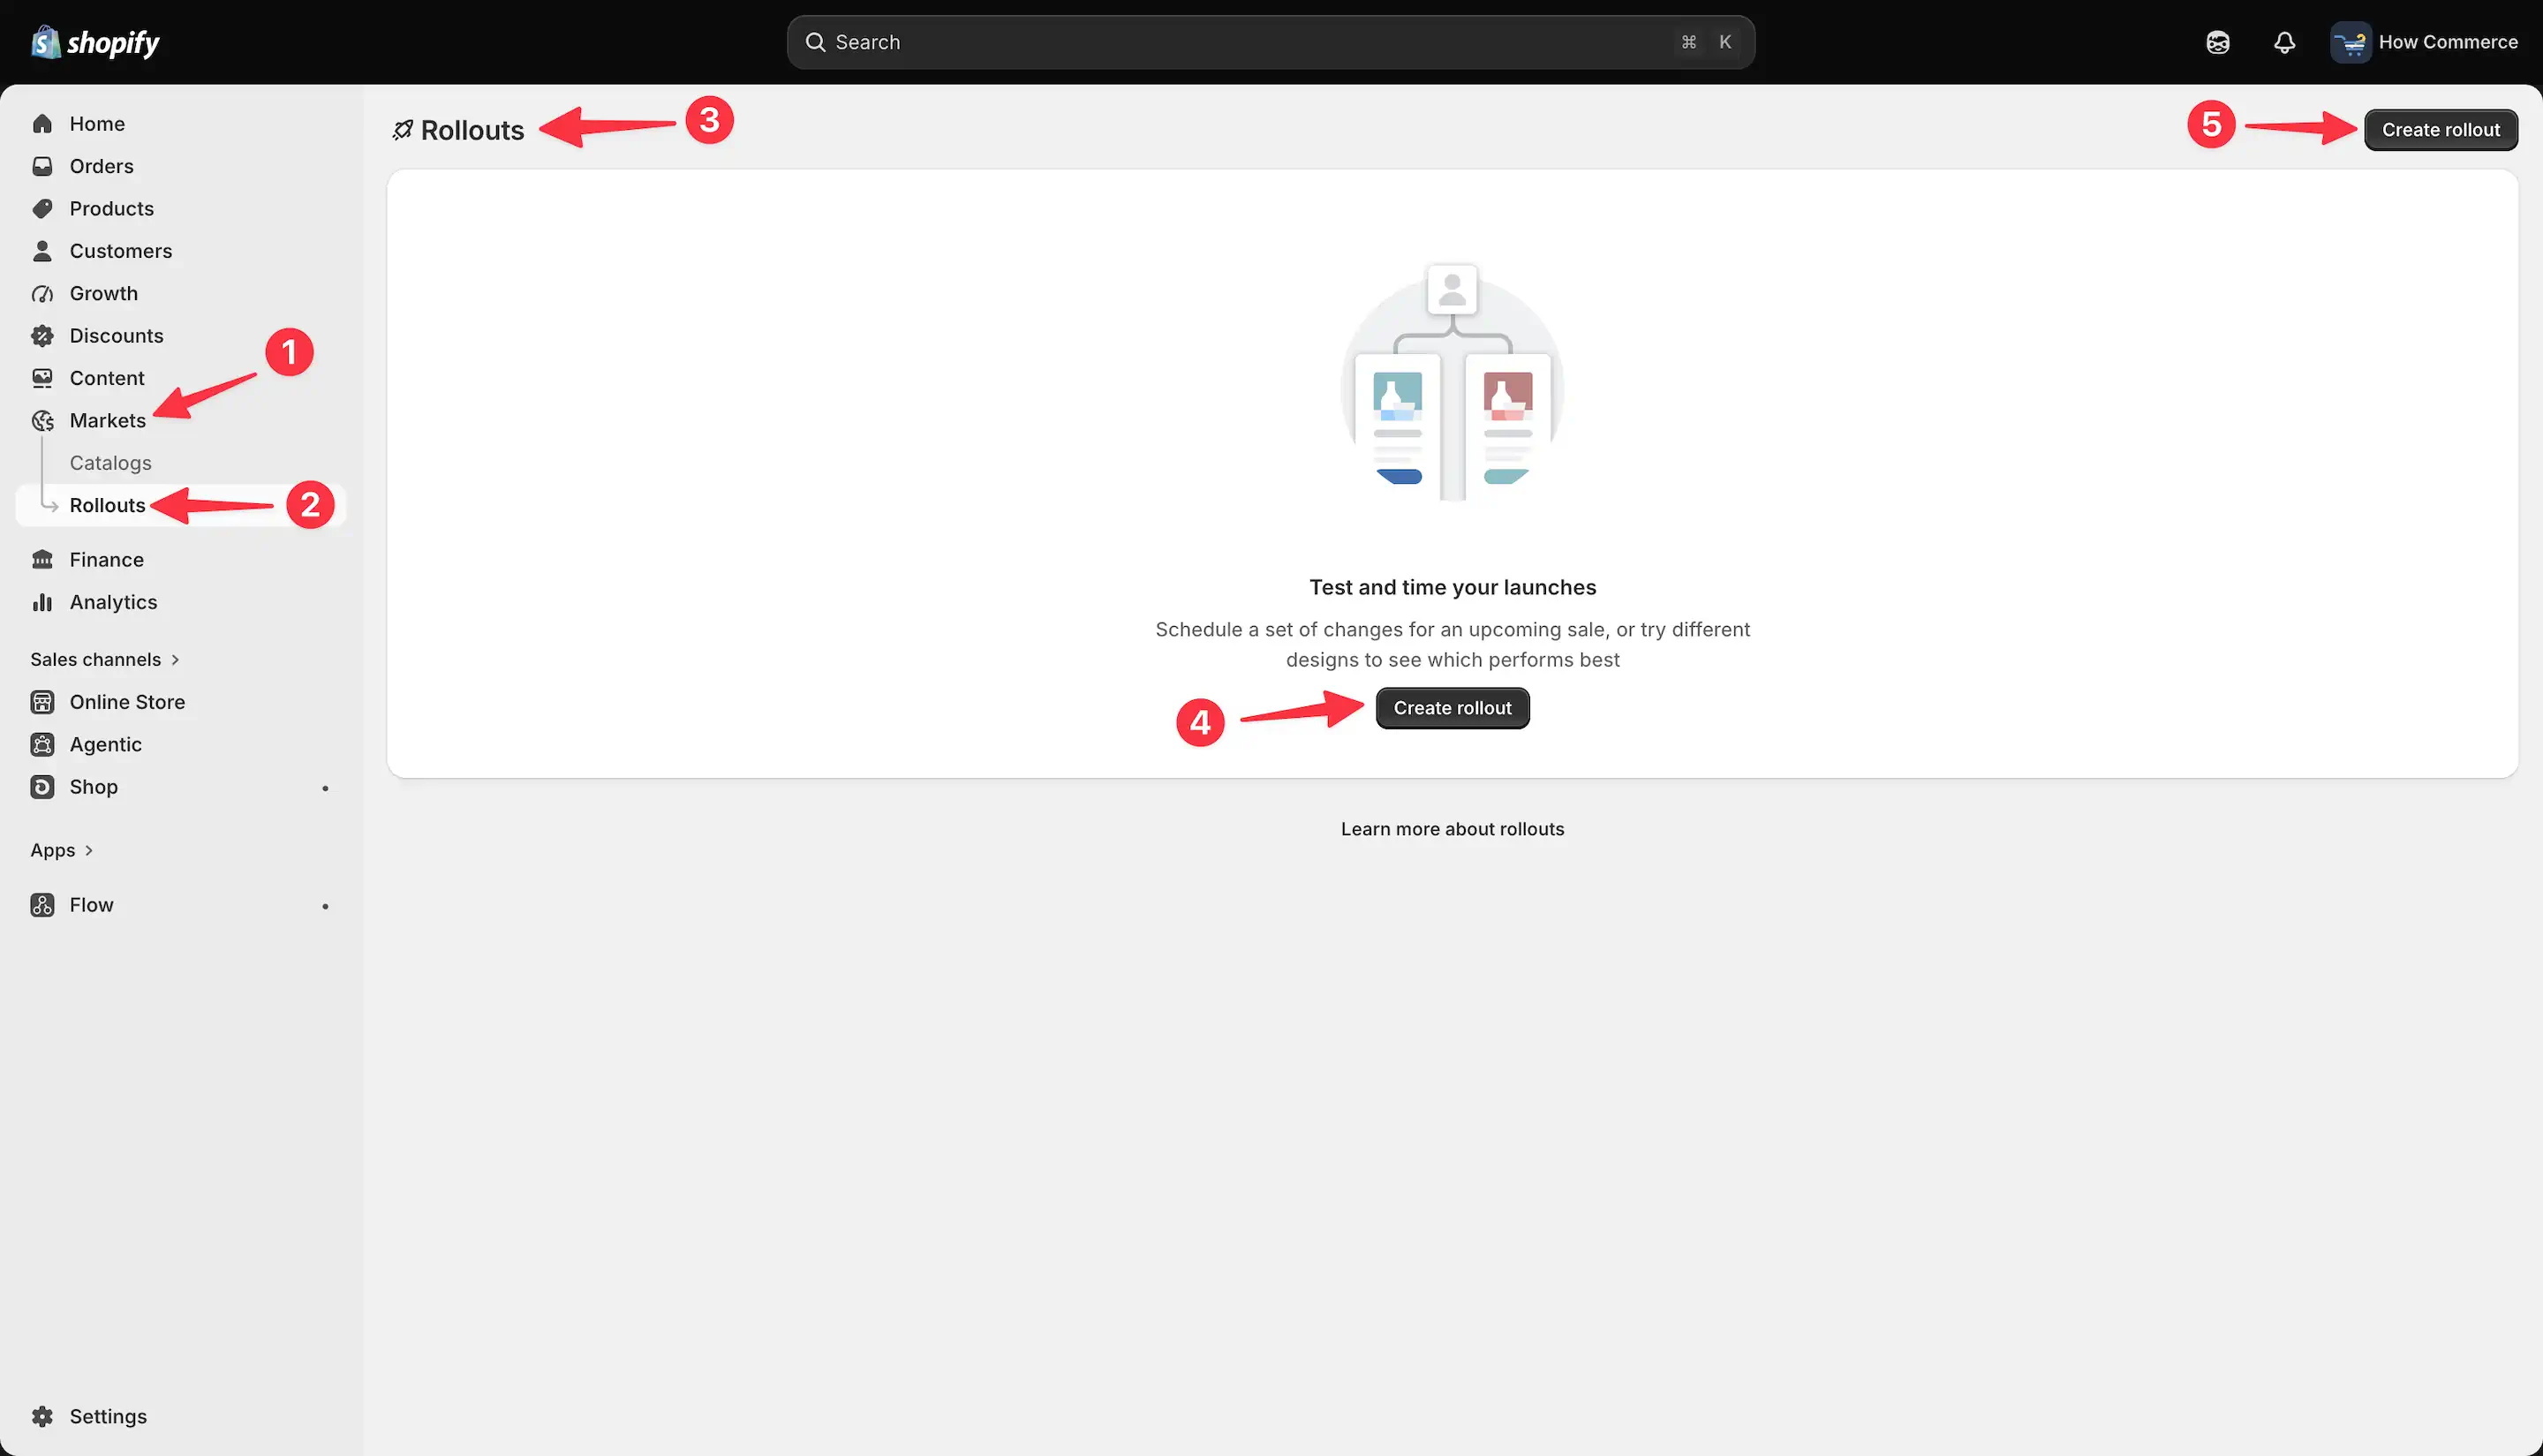
Next, go to Markets (marked with 1 in the image below) and select Rollouts (marked with 2 in the image below).
You should now see the Rollouts page (marked with 3 in the image below).
Click the Create rollout button (marked with 4 or 5 in the image below) to create a new rollout.
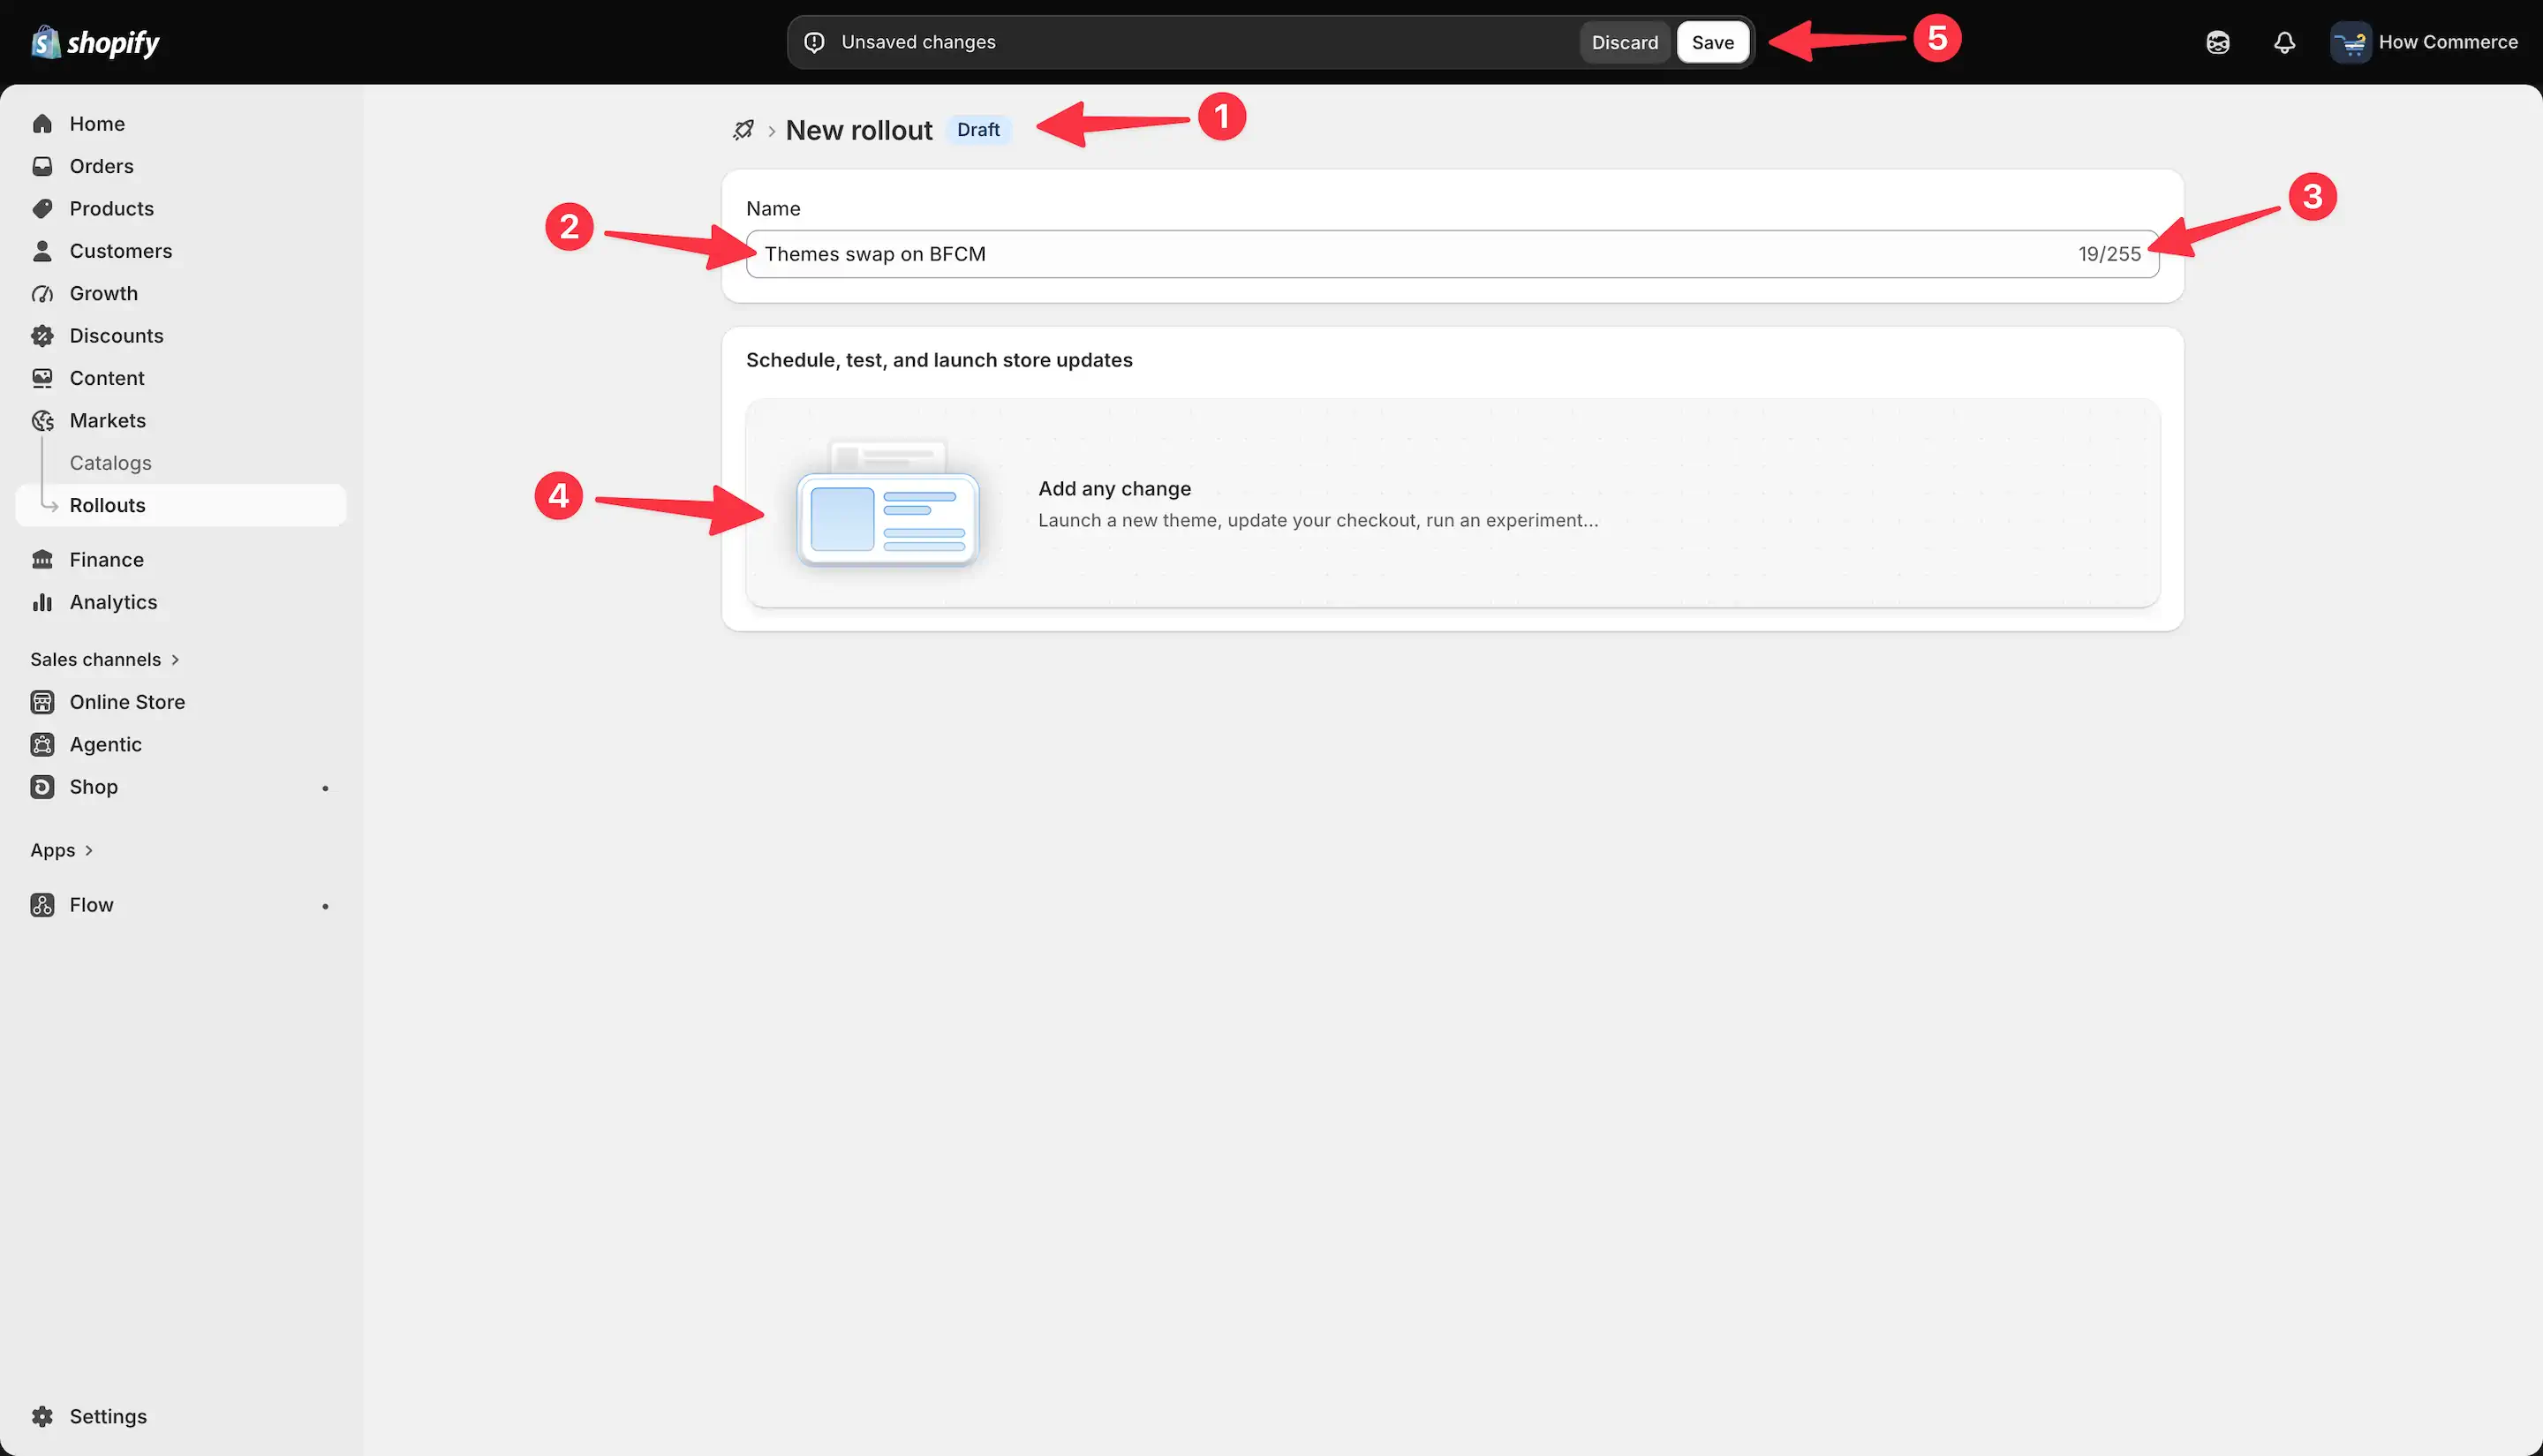
Now we're going to create a new rollout on the New rollout page (marked with 1 in the image below).
I'll name this rollout "Theme swap for BFCM" (marked with 2 in the image below), since it's a great opportunity to give the store a fresh look during the BFCM period.
Many merchants use black, orange, or red color schemes during this time.
A dedicated BFCM theme not only matches the season but also helps visitors immediately recognize that a special promotion or sale is taking place.
Keep in mind that the rollout title can't exceed 255 characters (marked with 3 in the image below), which is Shopify's limit for rollout titles.
Under "Schedule, test, and launch store updates" (marked with 4 in the image below), click the large rectangle labeled "Add any change".
Save the new rollout
Before continuing, click the "Save" button to save the rollout in its current state. This ensures that you don't lose any changes you've made so far, even though the rollout is still empty.
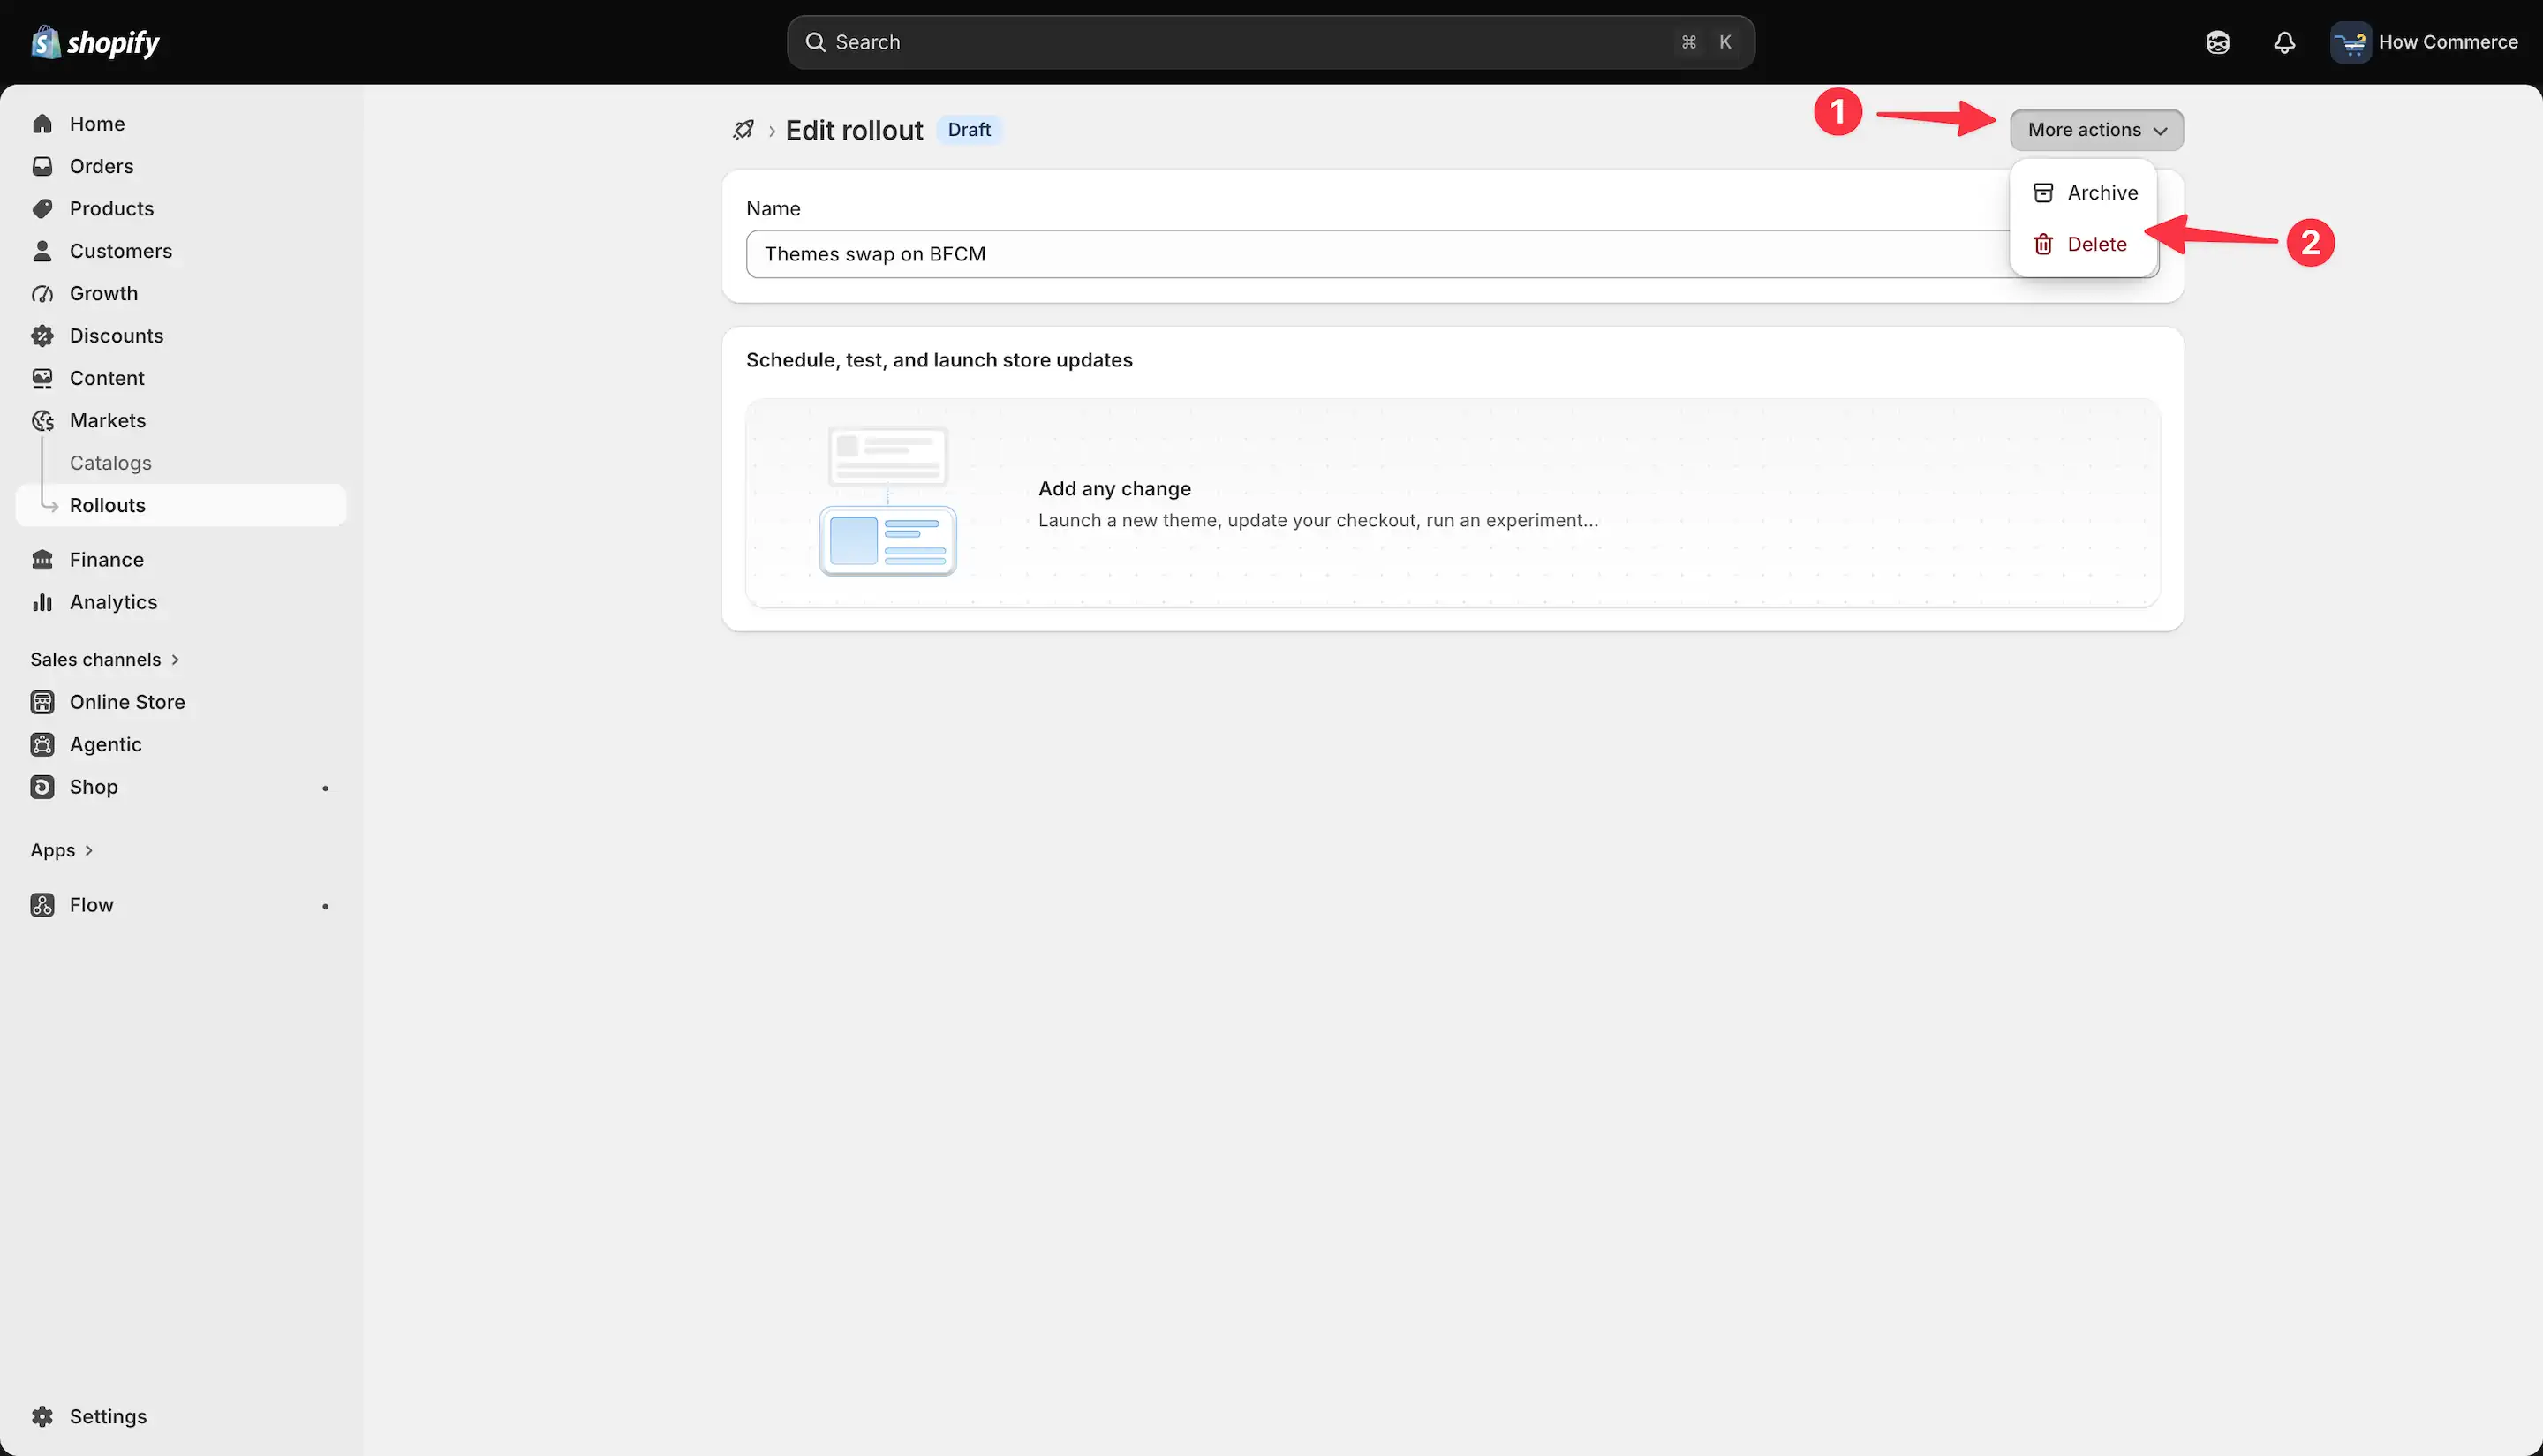
Once your new rollout has been saved, you'll see additional options, such as the "More actions" menu (marked with 1 in the image below).
Clicking this menu opens a drop-down that lets you archive or delete the rollout (marked with 2 in the image below).
Set up the change
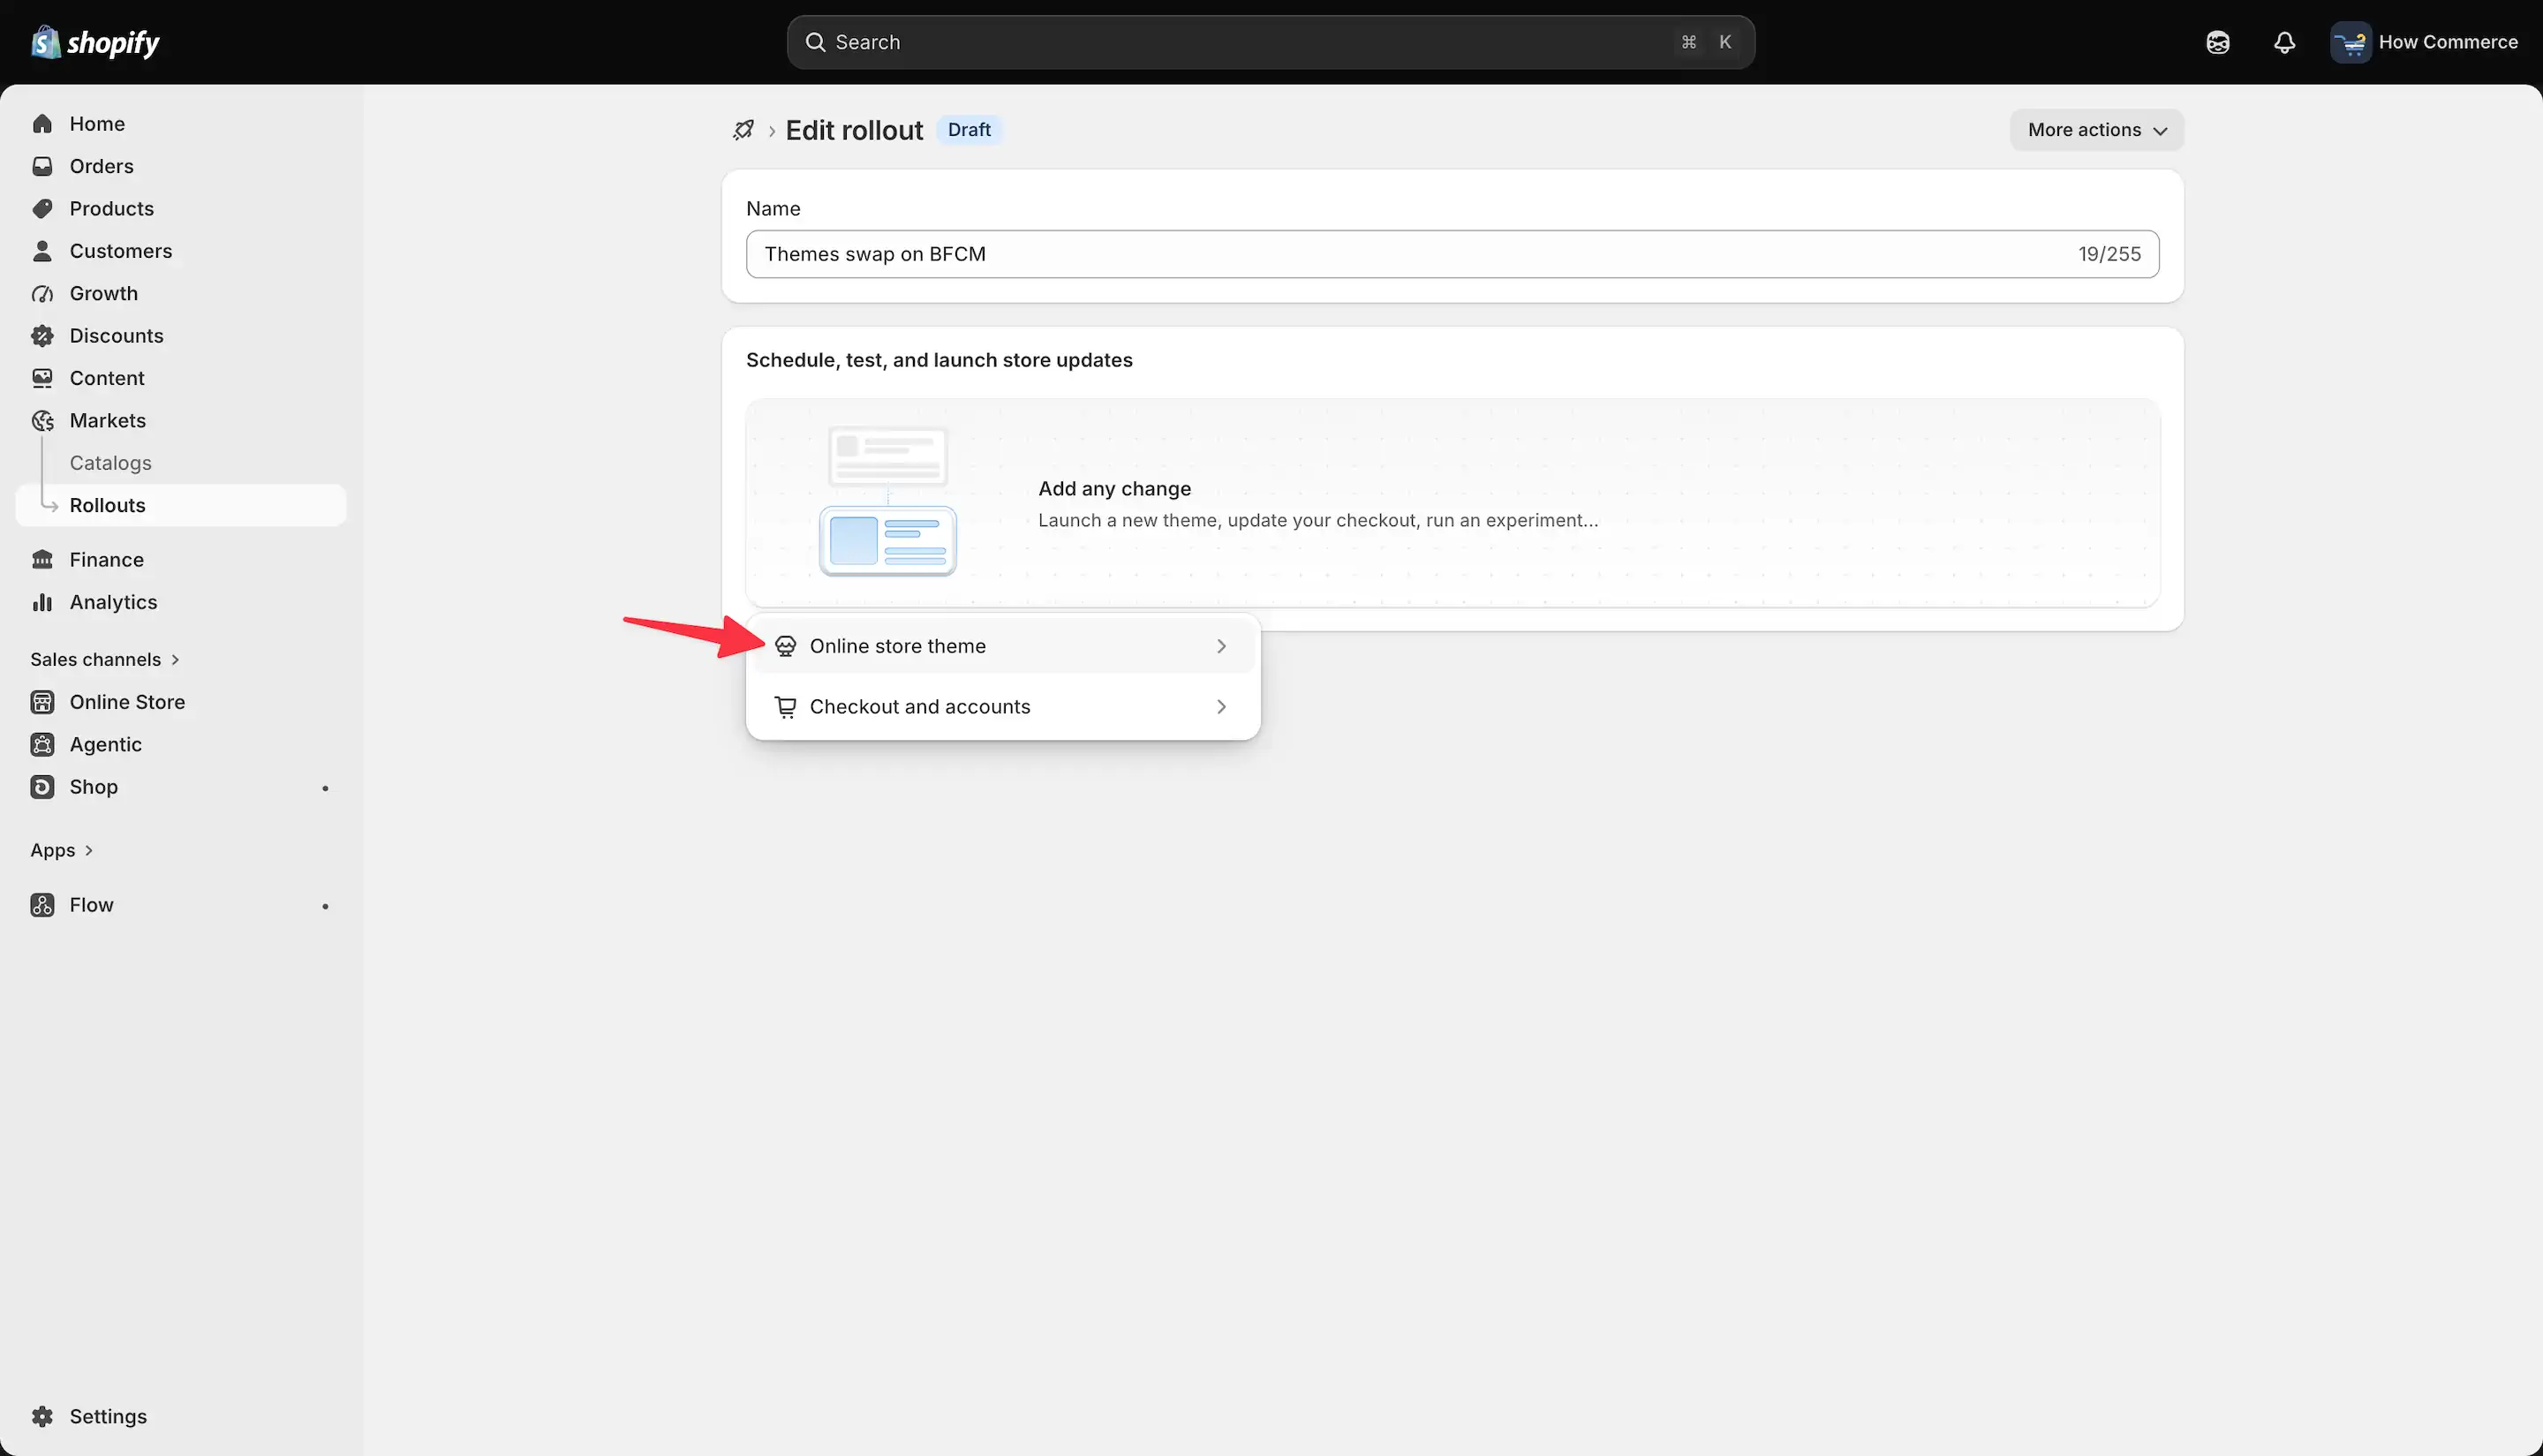
Now let's return to the "Add any change" rectangle. Clicking it opens a drop-down menu with two available options:
- Online store theme
- Checkout and accounts
For this tutorial, we're interested in the first option, "Online store theme". Select it, and let's continue to the next step.
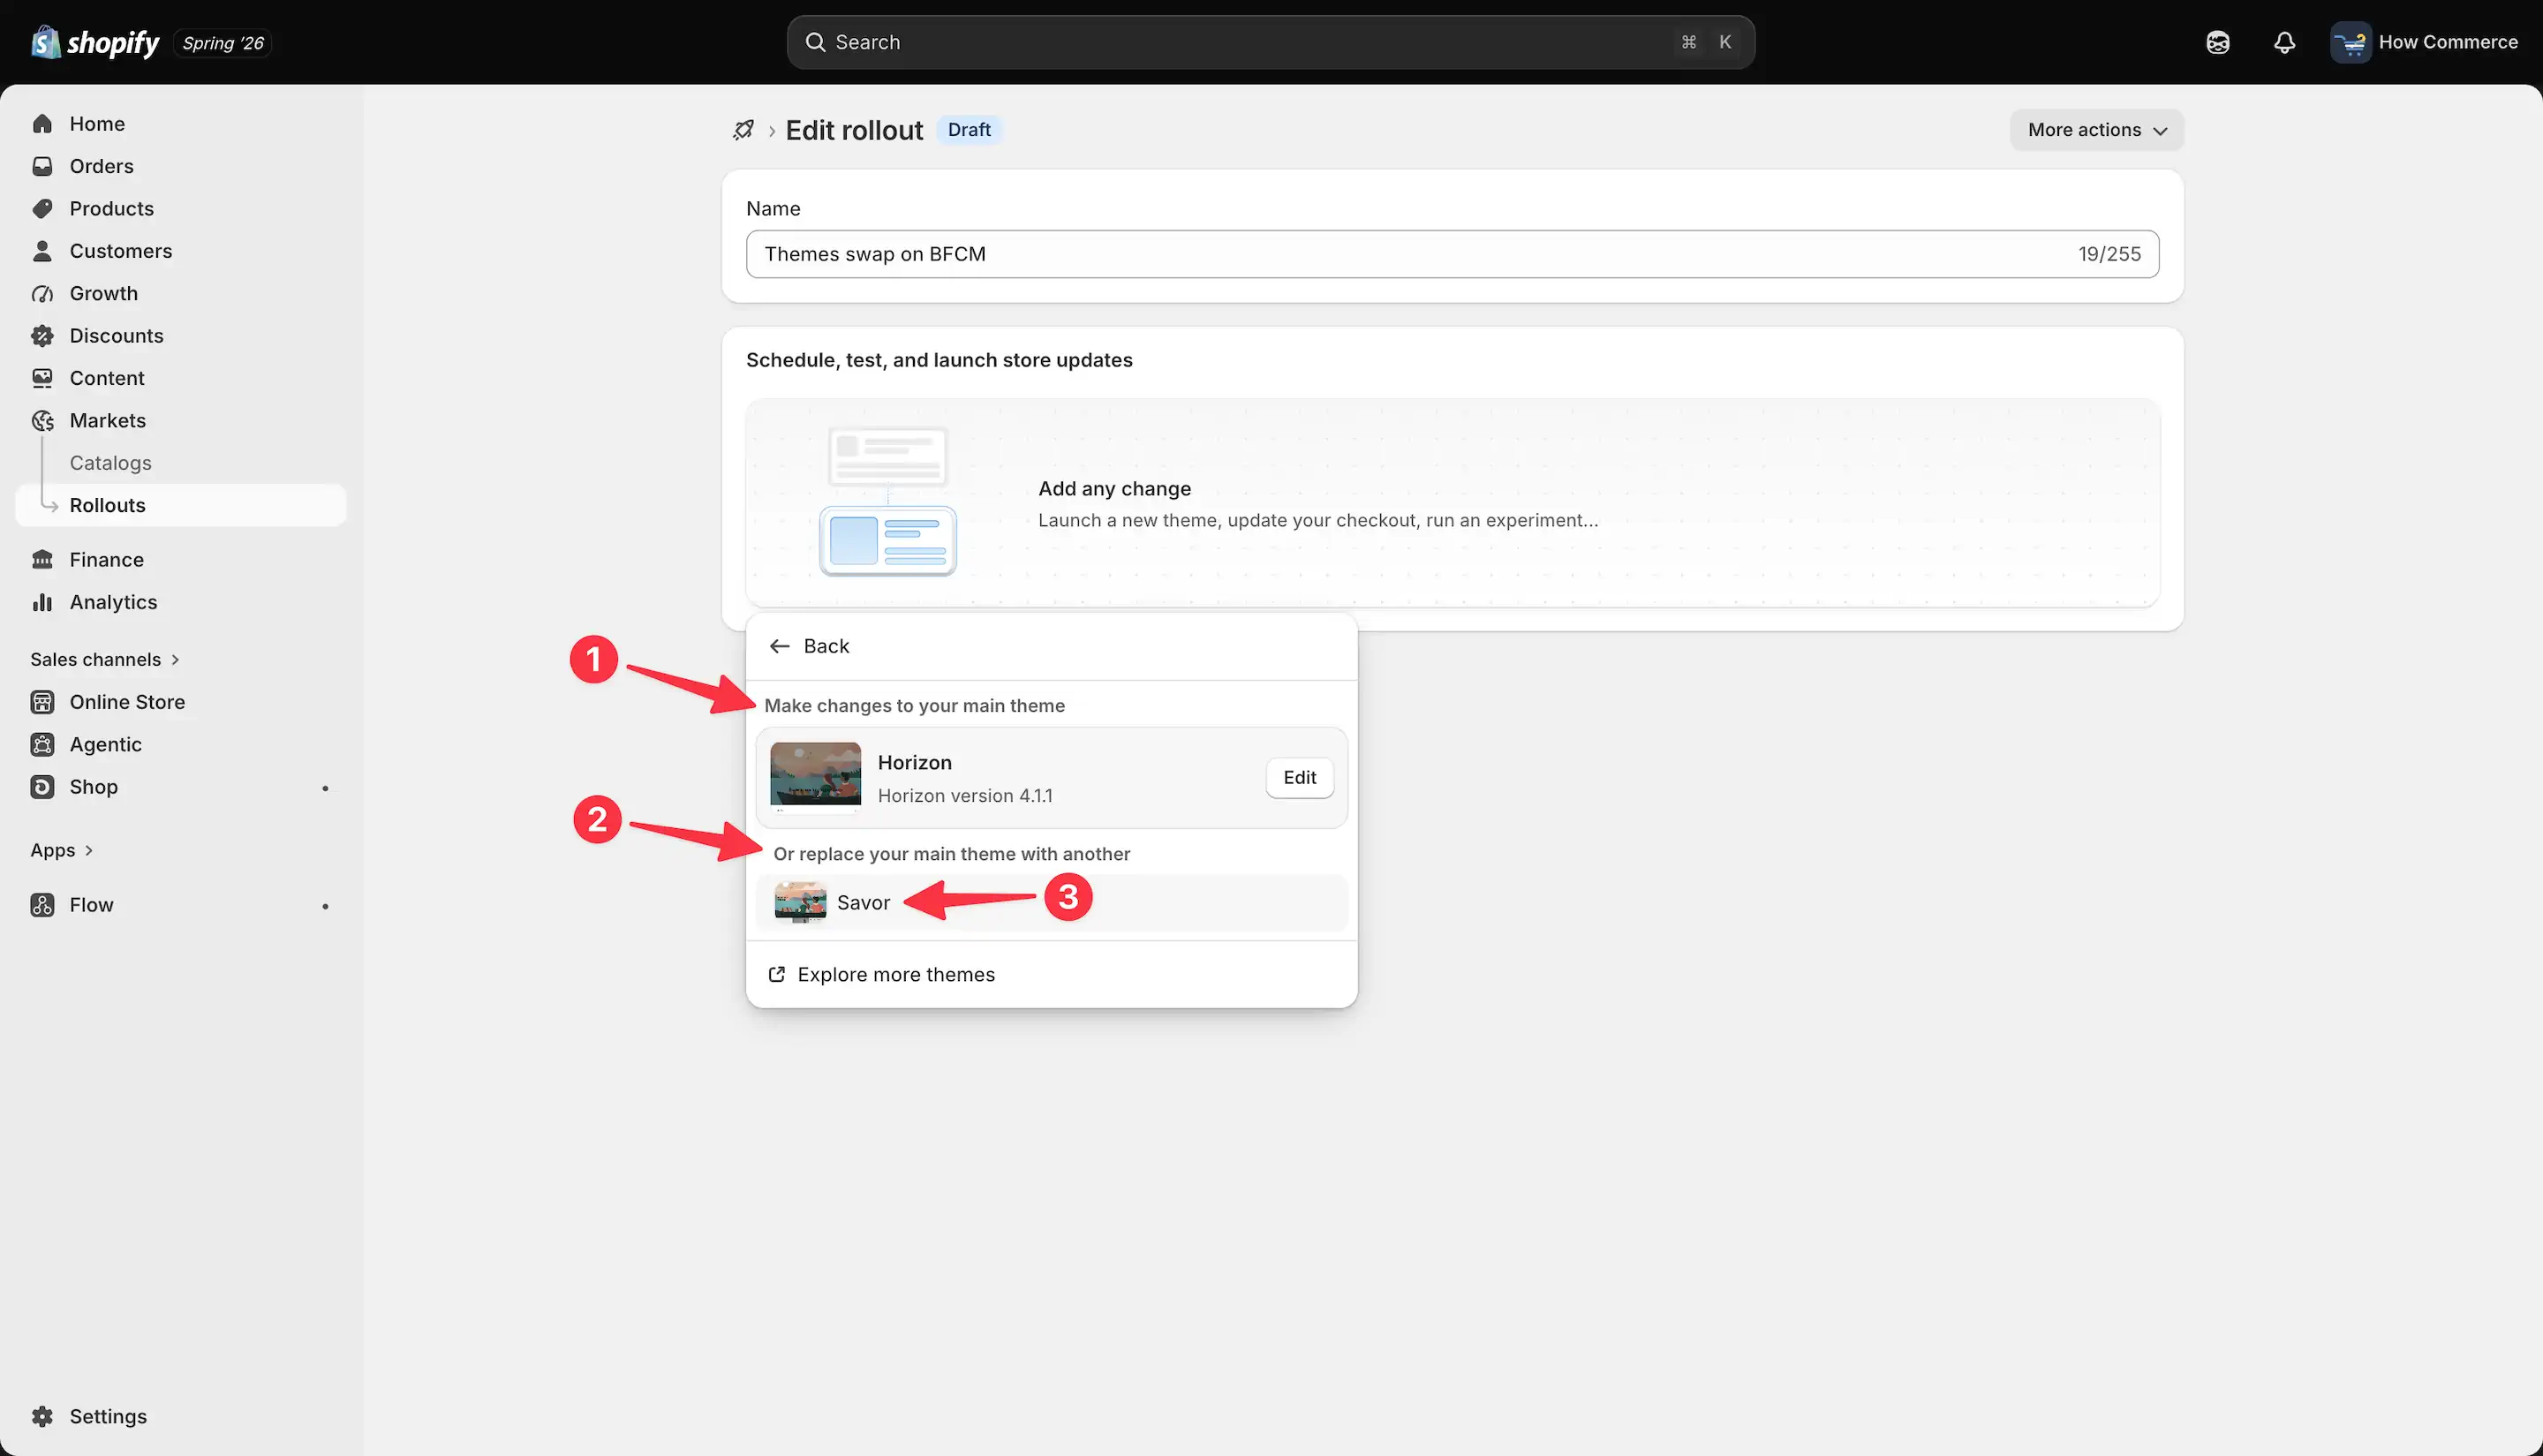
The same drop-down now displays all the themes installed on your store.
The first theme listed is your published theme, which in my example is the Horizon theme (marked with 1 in the image below).
Although you have the option to make changes to the current theme, that's not the focus of this tutorial.
Instead, we're interested in the "Or replace your main theme with another" section.
In my example, the Savor theme is listed there. Click on it (marked with 3 in the image below) to use it as the replacement theme for the rollout. If you need to learn more about how to change themes on Shopify, refer to our complete guide.
Configure the rollout details
You can now configure the rollout settings.
After adding the change, you'll need to set the rollout schedule, audience, and duration.
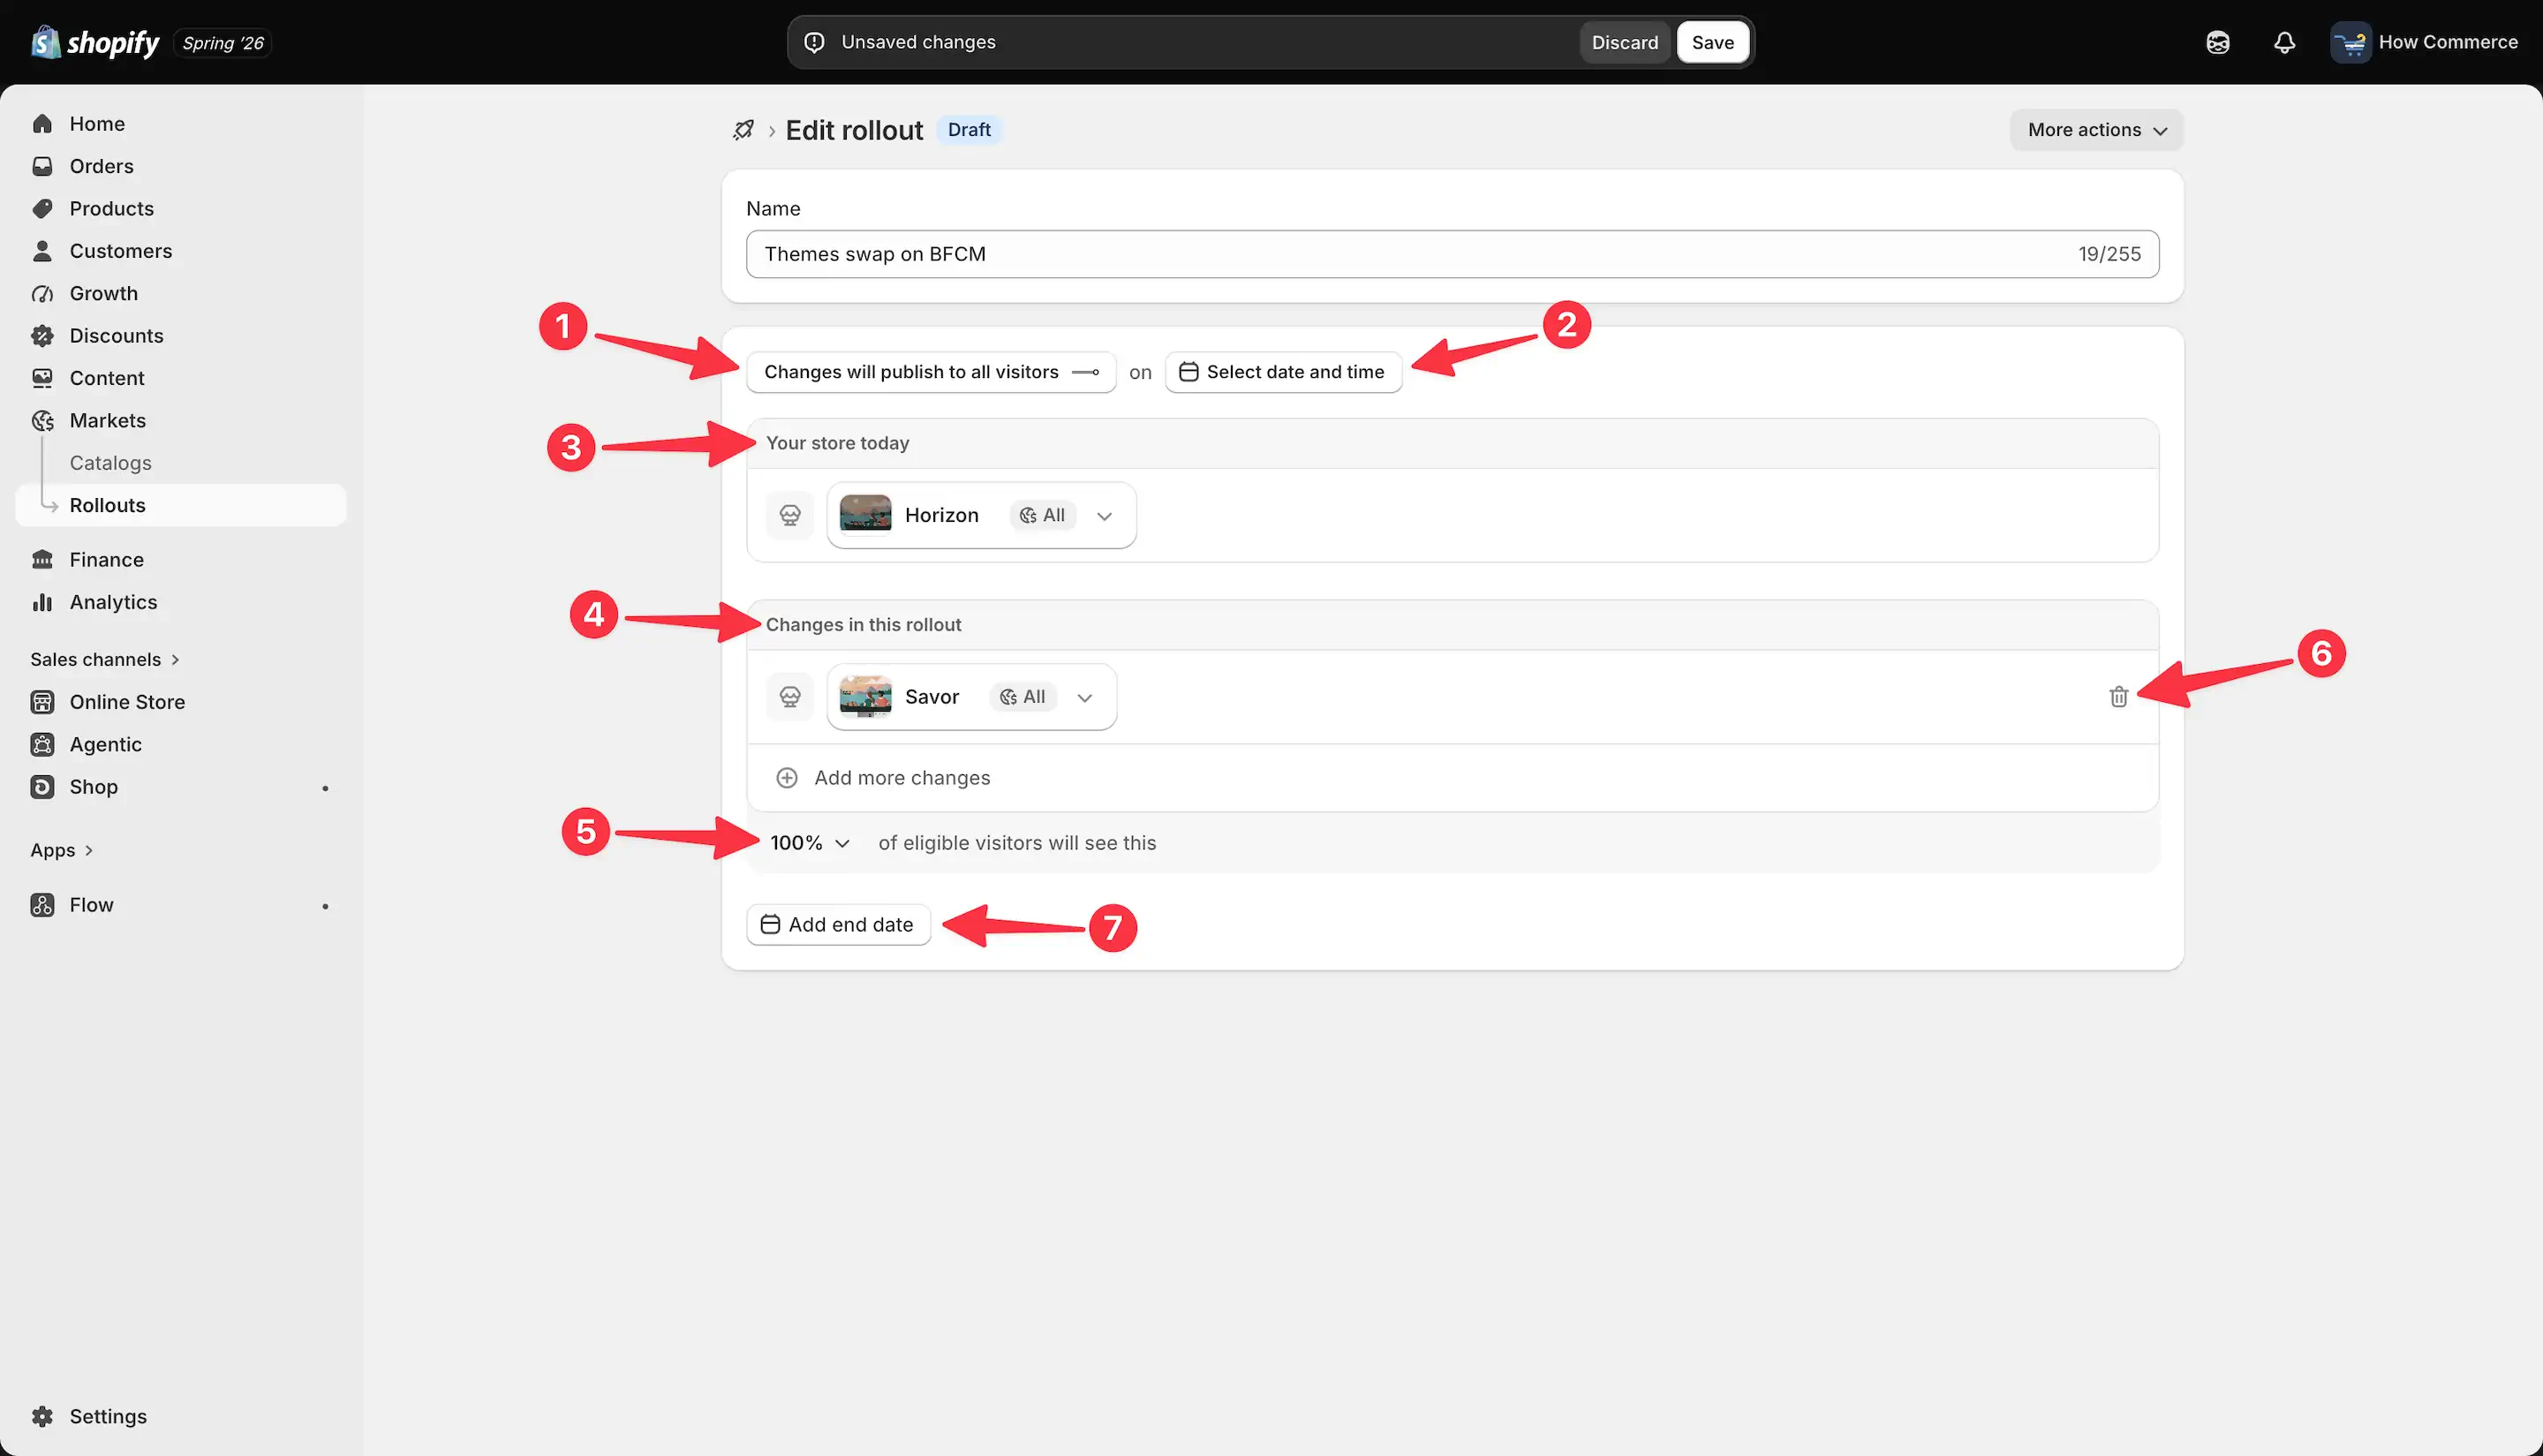
First, select the visitor segment (marked with 1 in the image below) that will receive the rollout. In my example, the rollout is available to all visitors, but you can choose any percentage between 0% and 100%.
Next, set the date and time when the rollout should become active (marked with 2 in the image below).
The current state of your store at the time you create the rollout is displayed below (marked with 3 in the image below).
You can also review the change that the rollout will apply (marked with 4 in the image below). In my example, the rollout replaces the published Horizon theme with the Savor theme.
The setting marked with 5 in the image below allows you to specify what percentage of the selected visitors will see the rollout.
This percentage is applied to the audience you selected earlier (marked with 1 in the image below).
In my case, I'll leave this value set to 100%.
If you need to modify the rollout, you can remove the change by clicking the delete icon (marked with 6 in the image below).
Be careful when using this option, as deleting the change may permanently remove the rollout configuration.
Finally, you can set an end date for the rollout (marked with 7 in the image below).
Once this date is reached, the rollout will stop and the selected audience will no longer receive it.
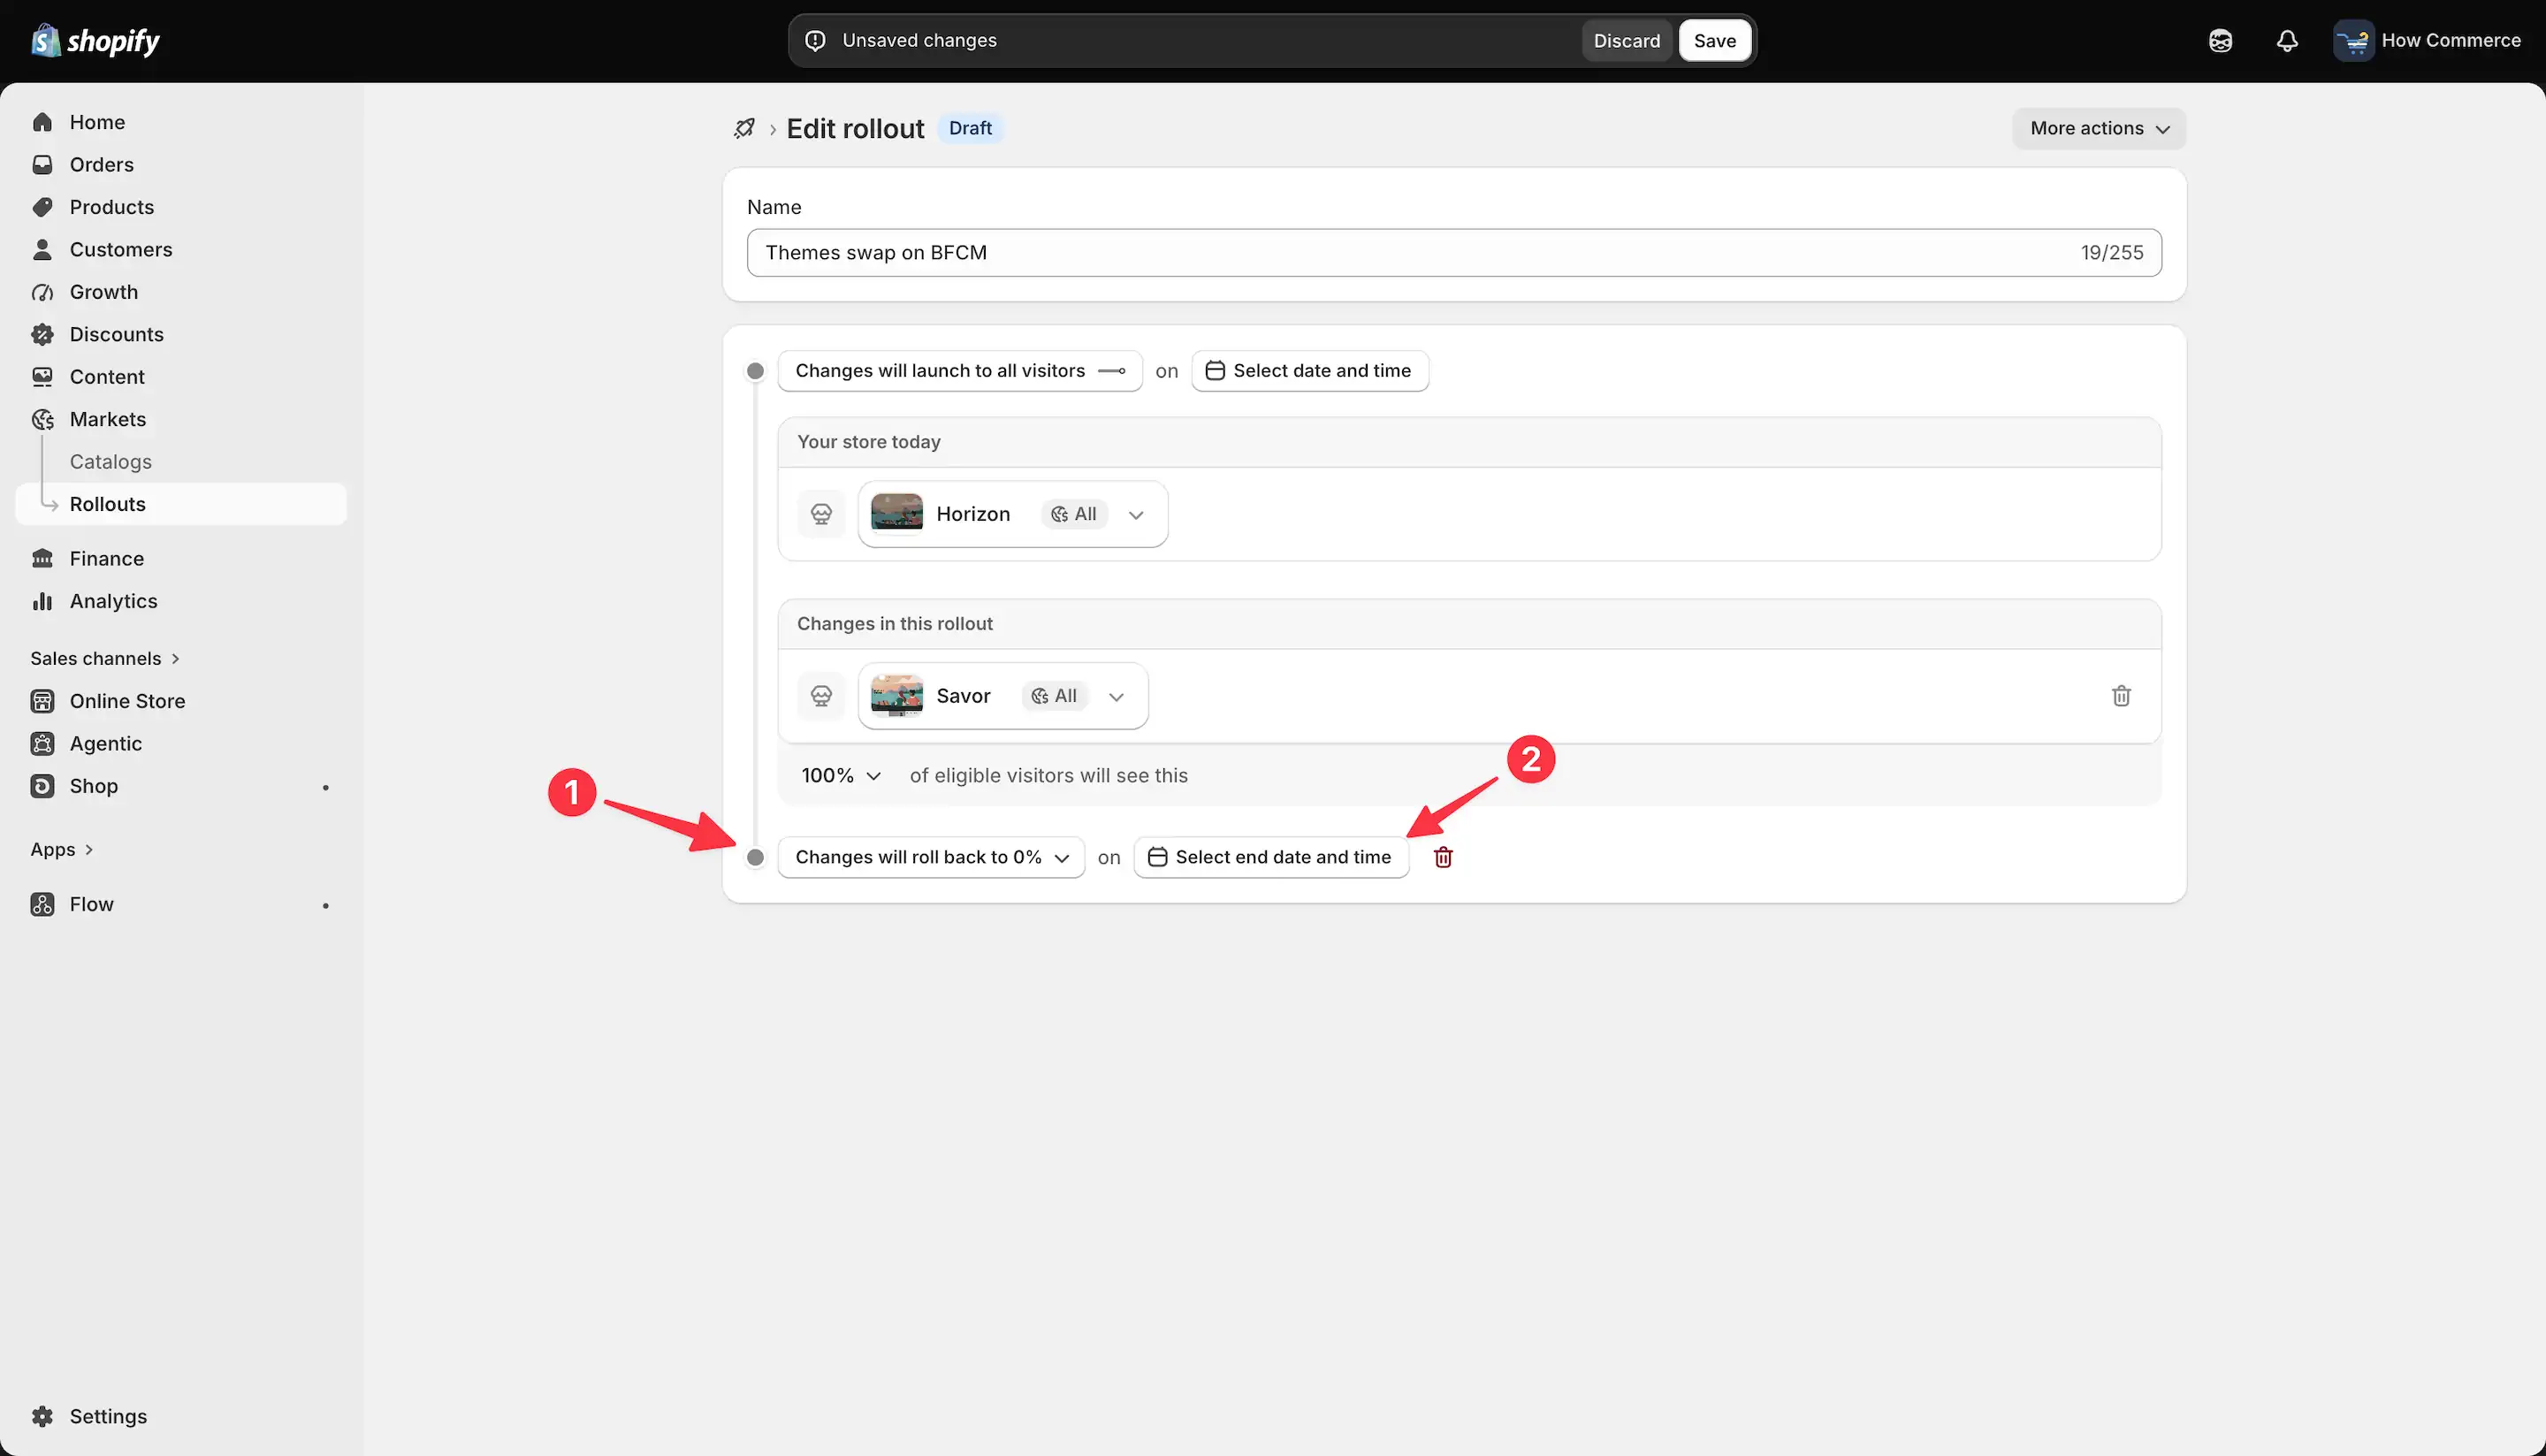
Next, select what happens when the rollout ends.
You can either revert the rollout or apply the changes permanently. By default, rollouts are configured to revert automatically.
In my example, I selected "Changes will roll back to 0%" (marked with 1 in the image below).
This means that once the rollout ends, all changes will be removed and the store will return to its previous state, with the Horizon theme active on the storefront.
You can also choose the "Will be applied permanently" option. In this case, the rollout changes remain active after the rollout ends. In our example, the Savor theme would become the permanent live theme.
Next, select the date and time (marked with 2 in the image below) when the selected action (marked with 1 in the image below) should take effect.
Depending on the option you choose, Shopify will either revert the changes or apply them permanently at the specified date and time.
In my example, I selected the "Changes will roll back to 0%" option, so the store will automatically switch back to the Horizon theme when the rollout ends.
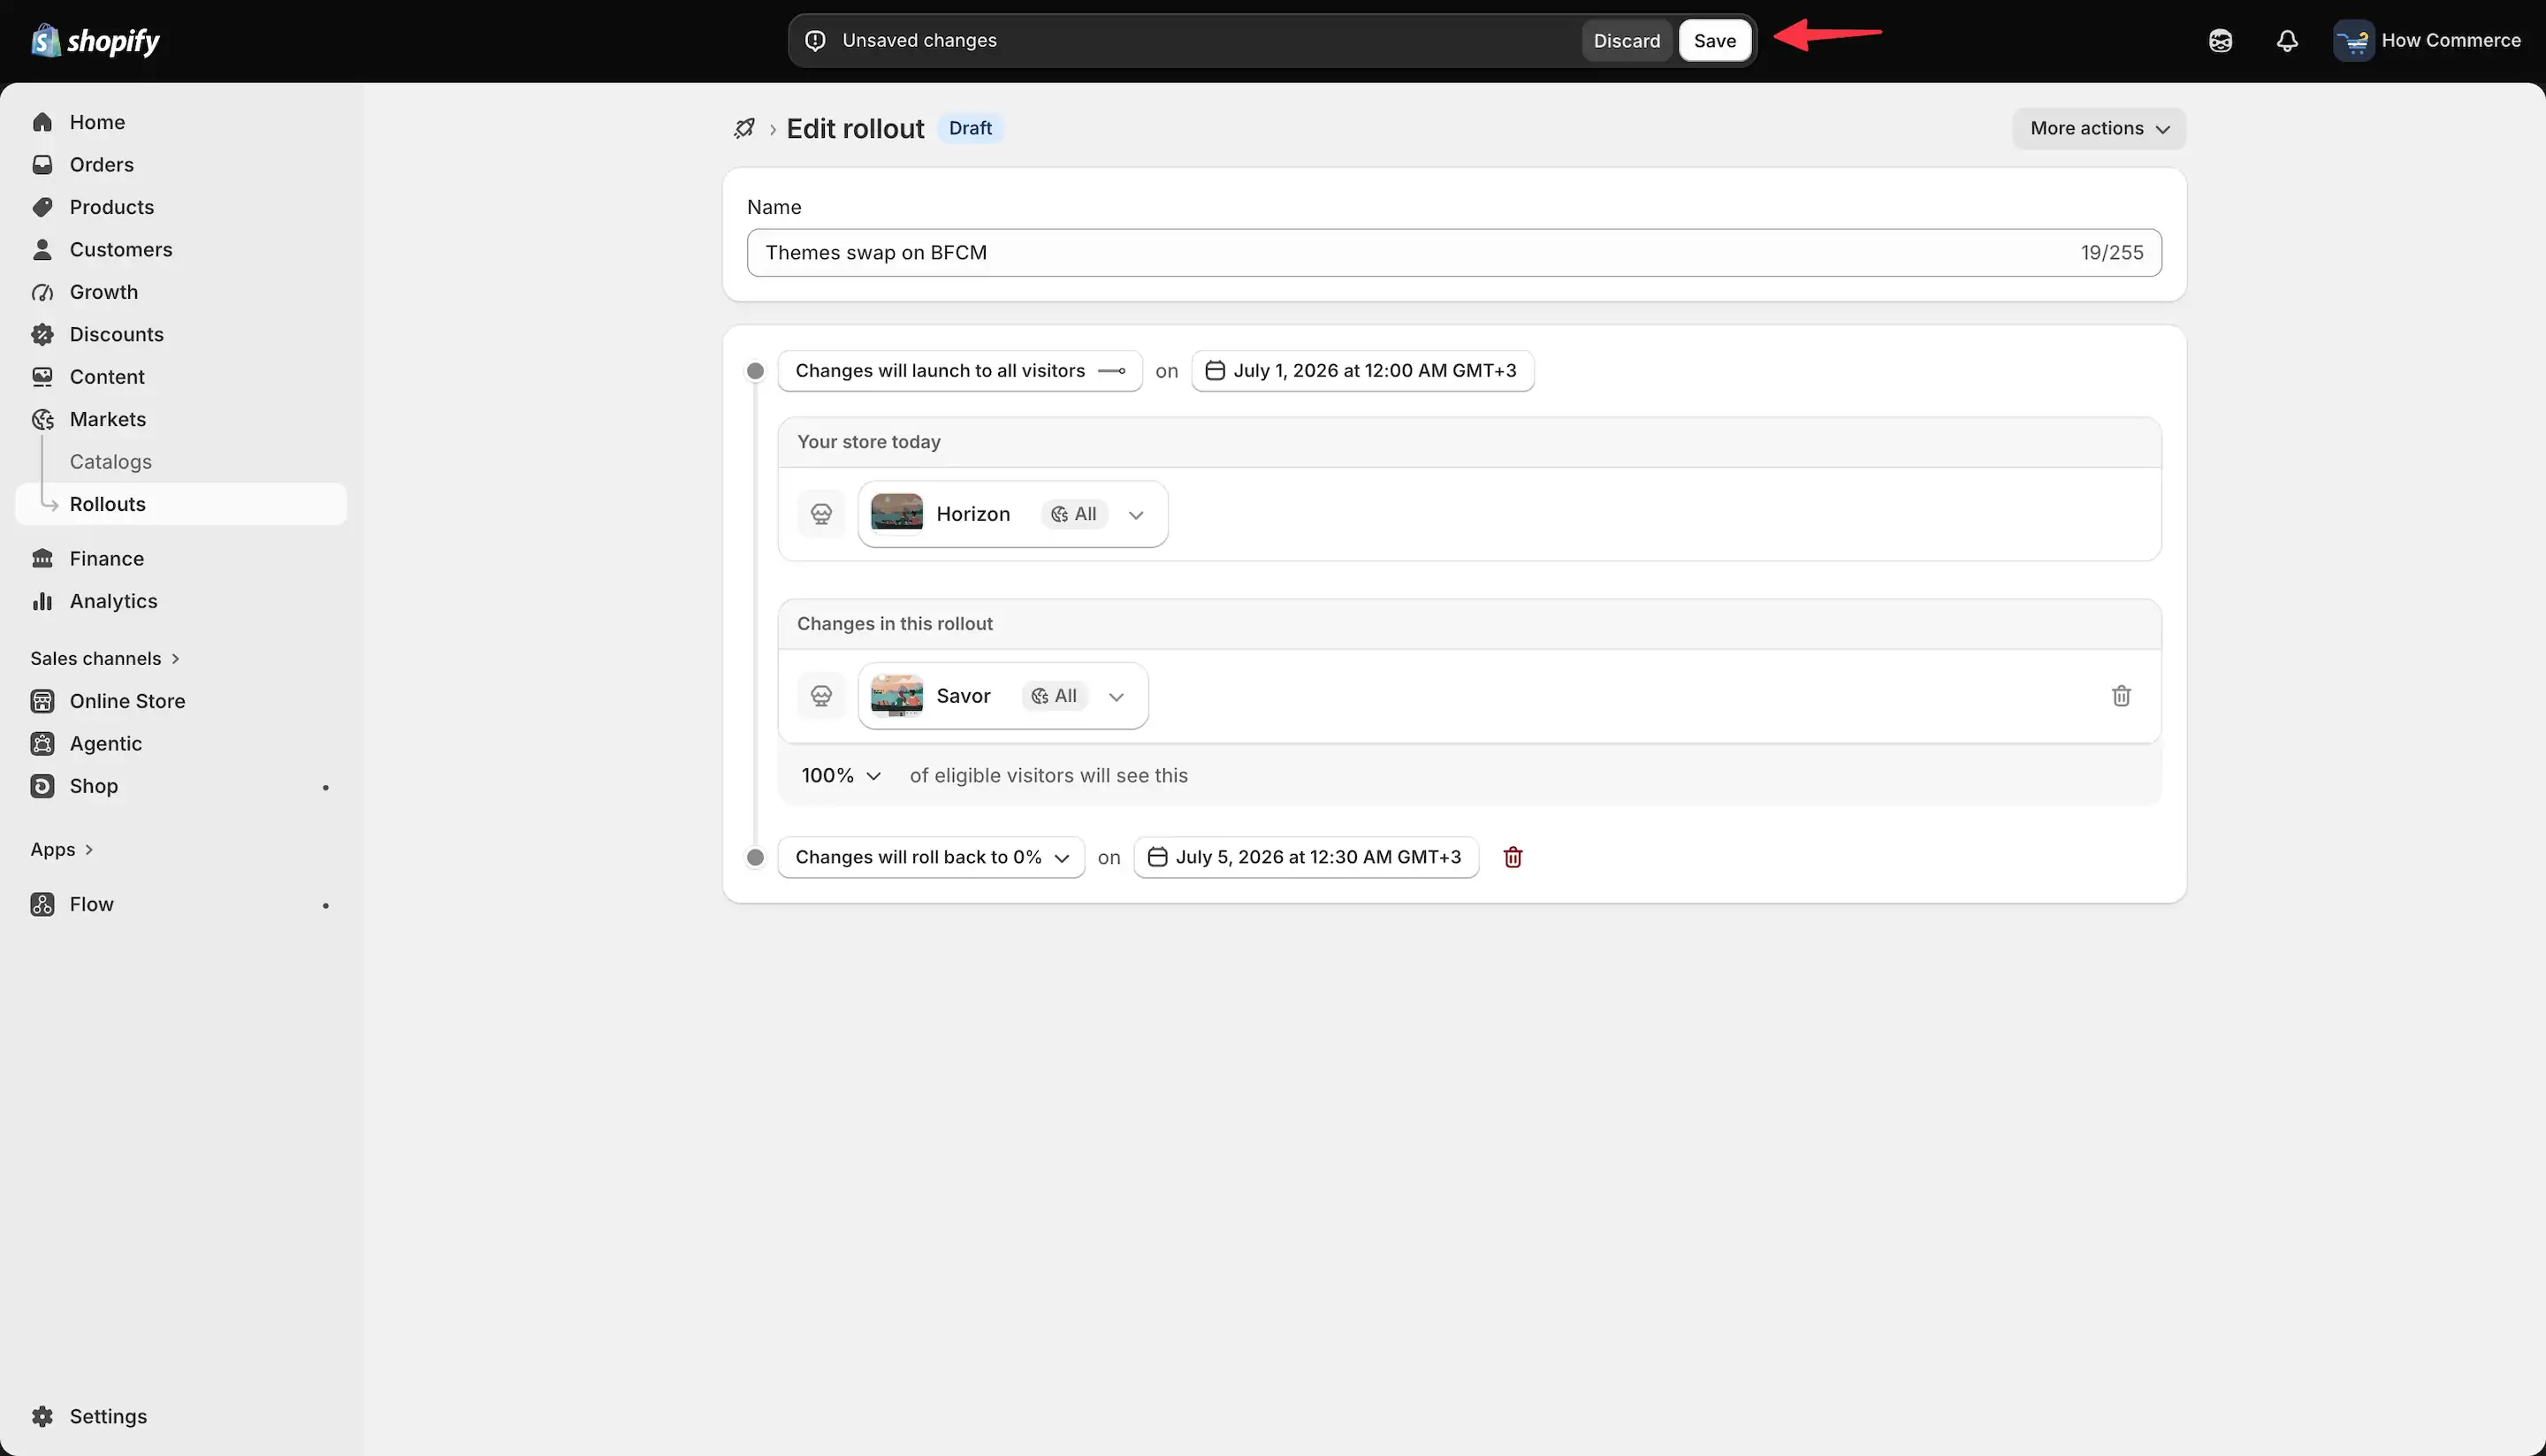
The rollout configuration is now complete.
Before saving, review all the settings one more time to make sure everything is configured correctly, and then click the Save button.
Your configuration should look similar to mine, with the only difference being the themes used.
In my example, the rollout starts on July 1 and ends on July 5, which means the theme swap will remain active for four days before the selected end action takes effect.
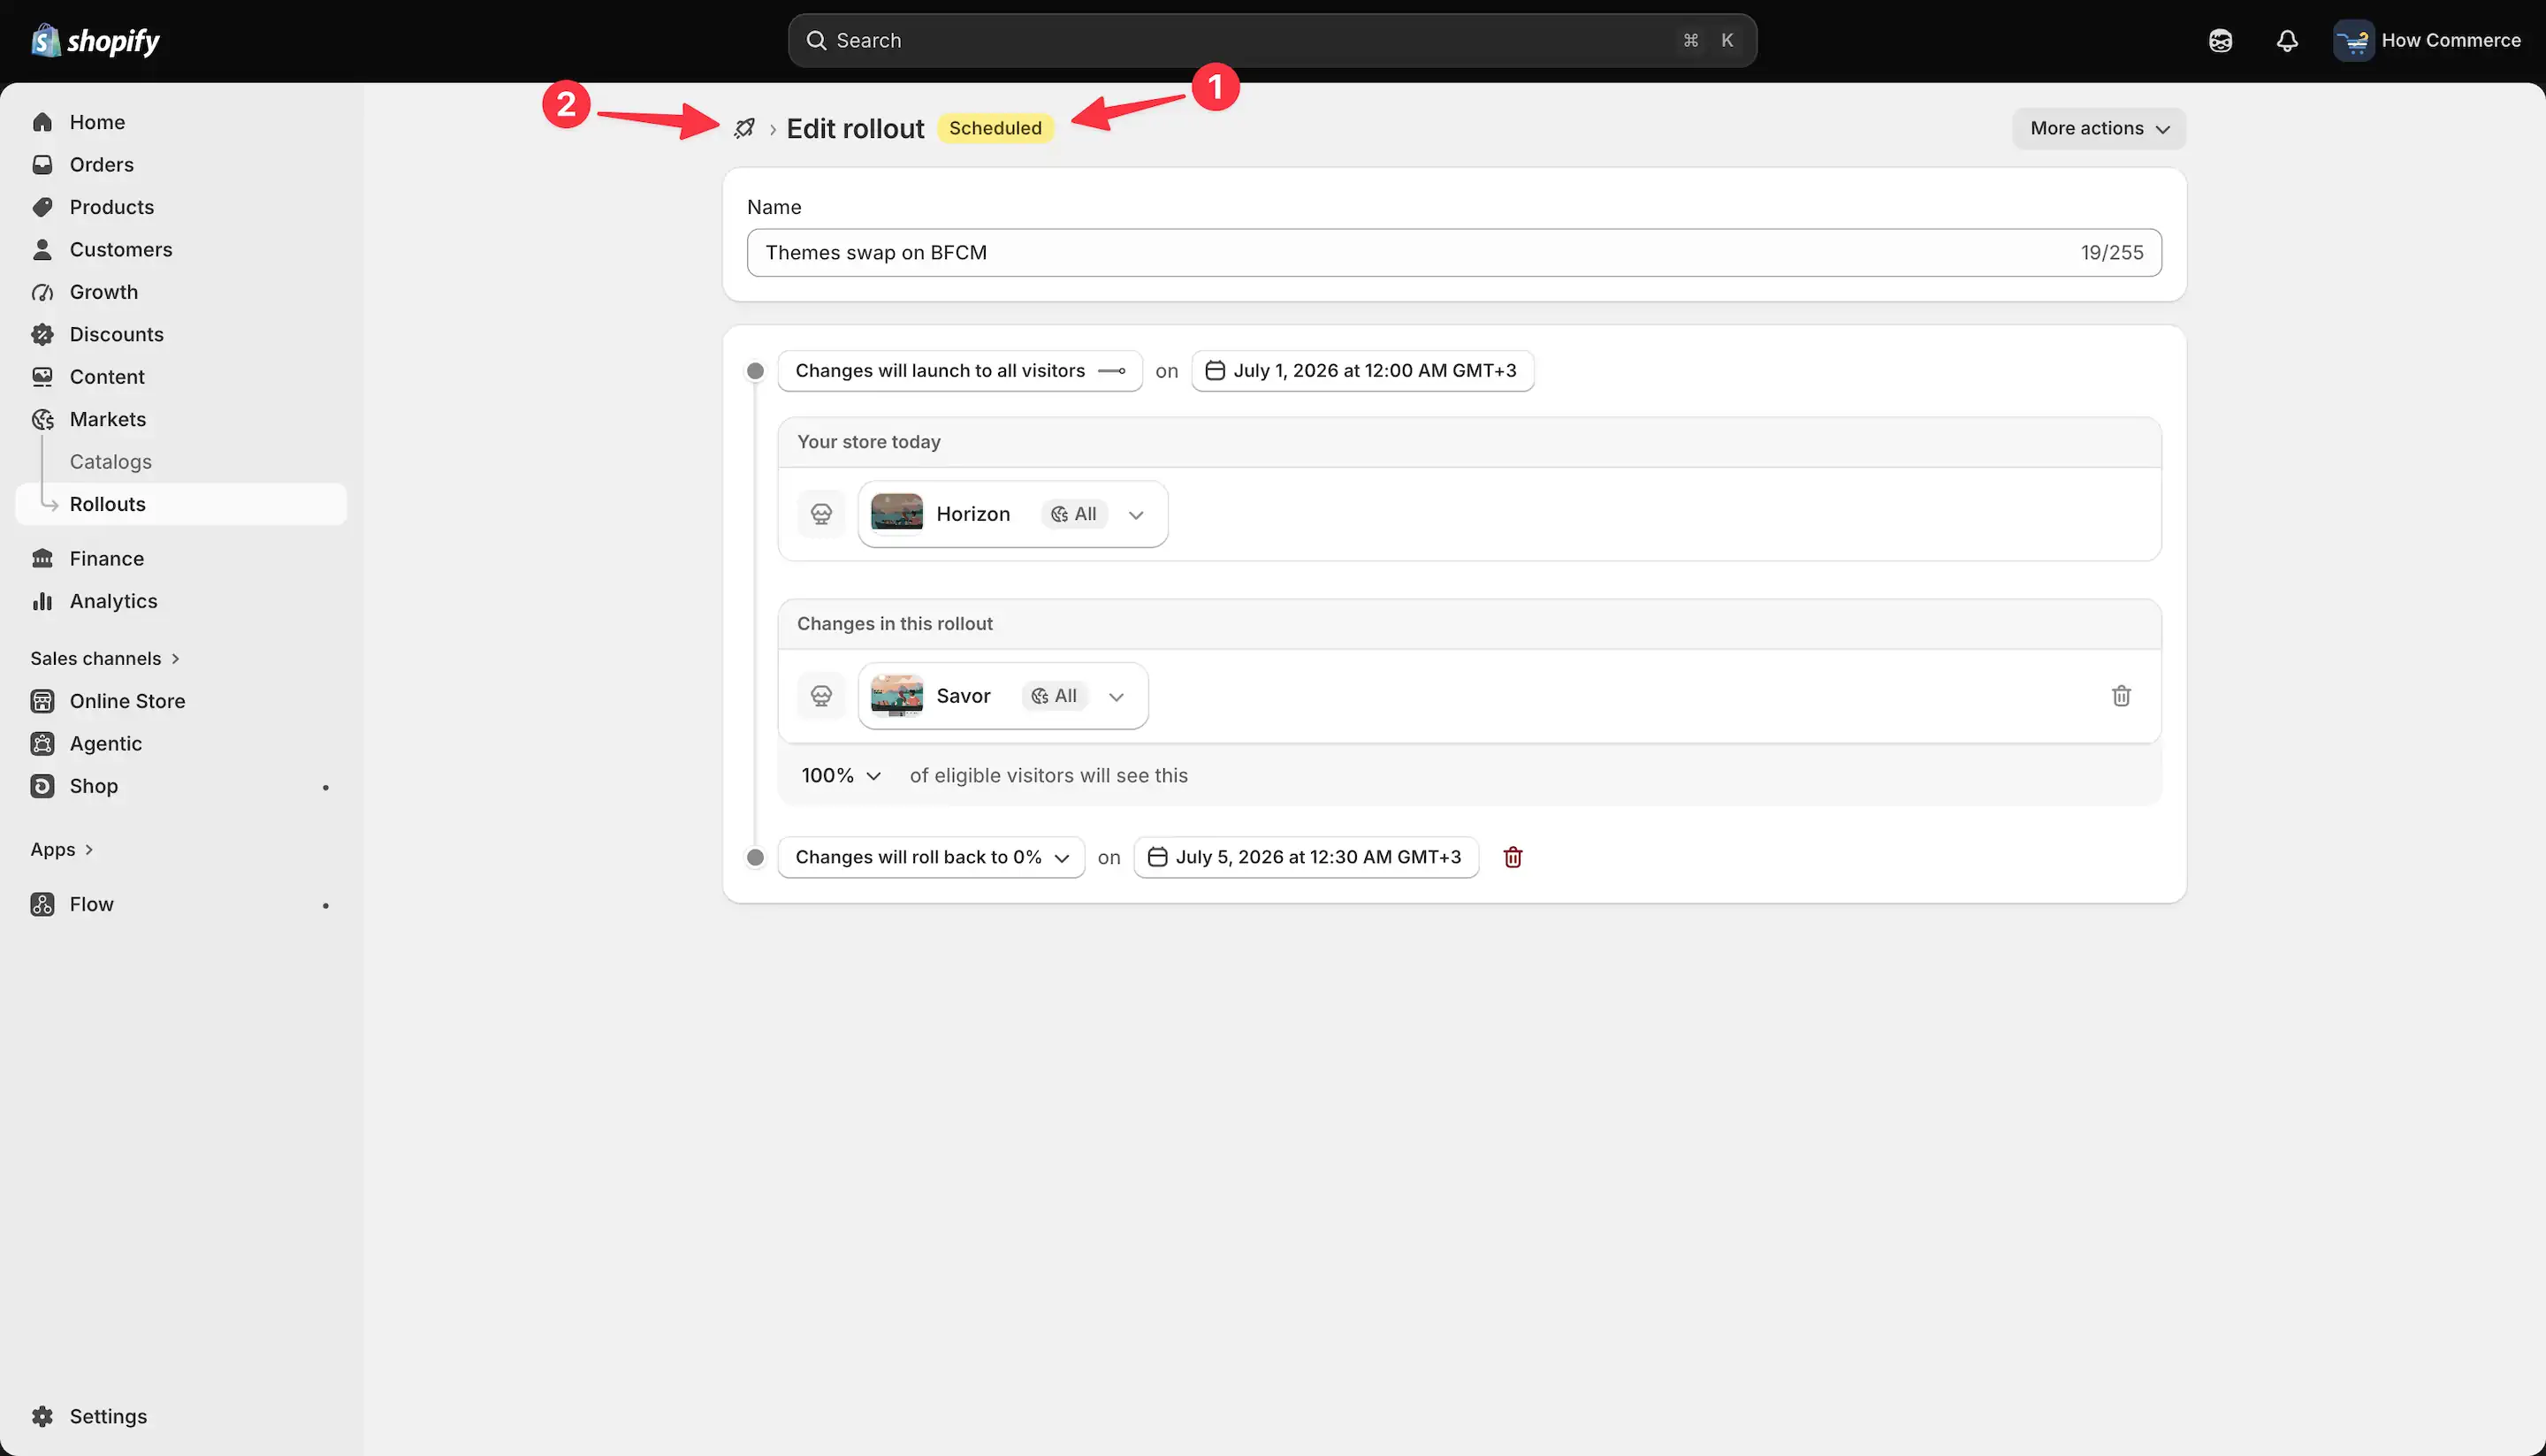
After saving the rollout, you should see the "Scheduled" status on the rollout editing page (marked with 1 in the image below).
To return to the full list of rollouts, click the icon (marked with 2 in the image below).
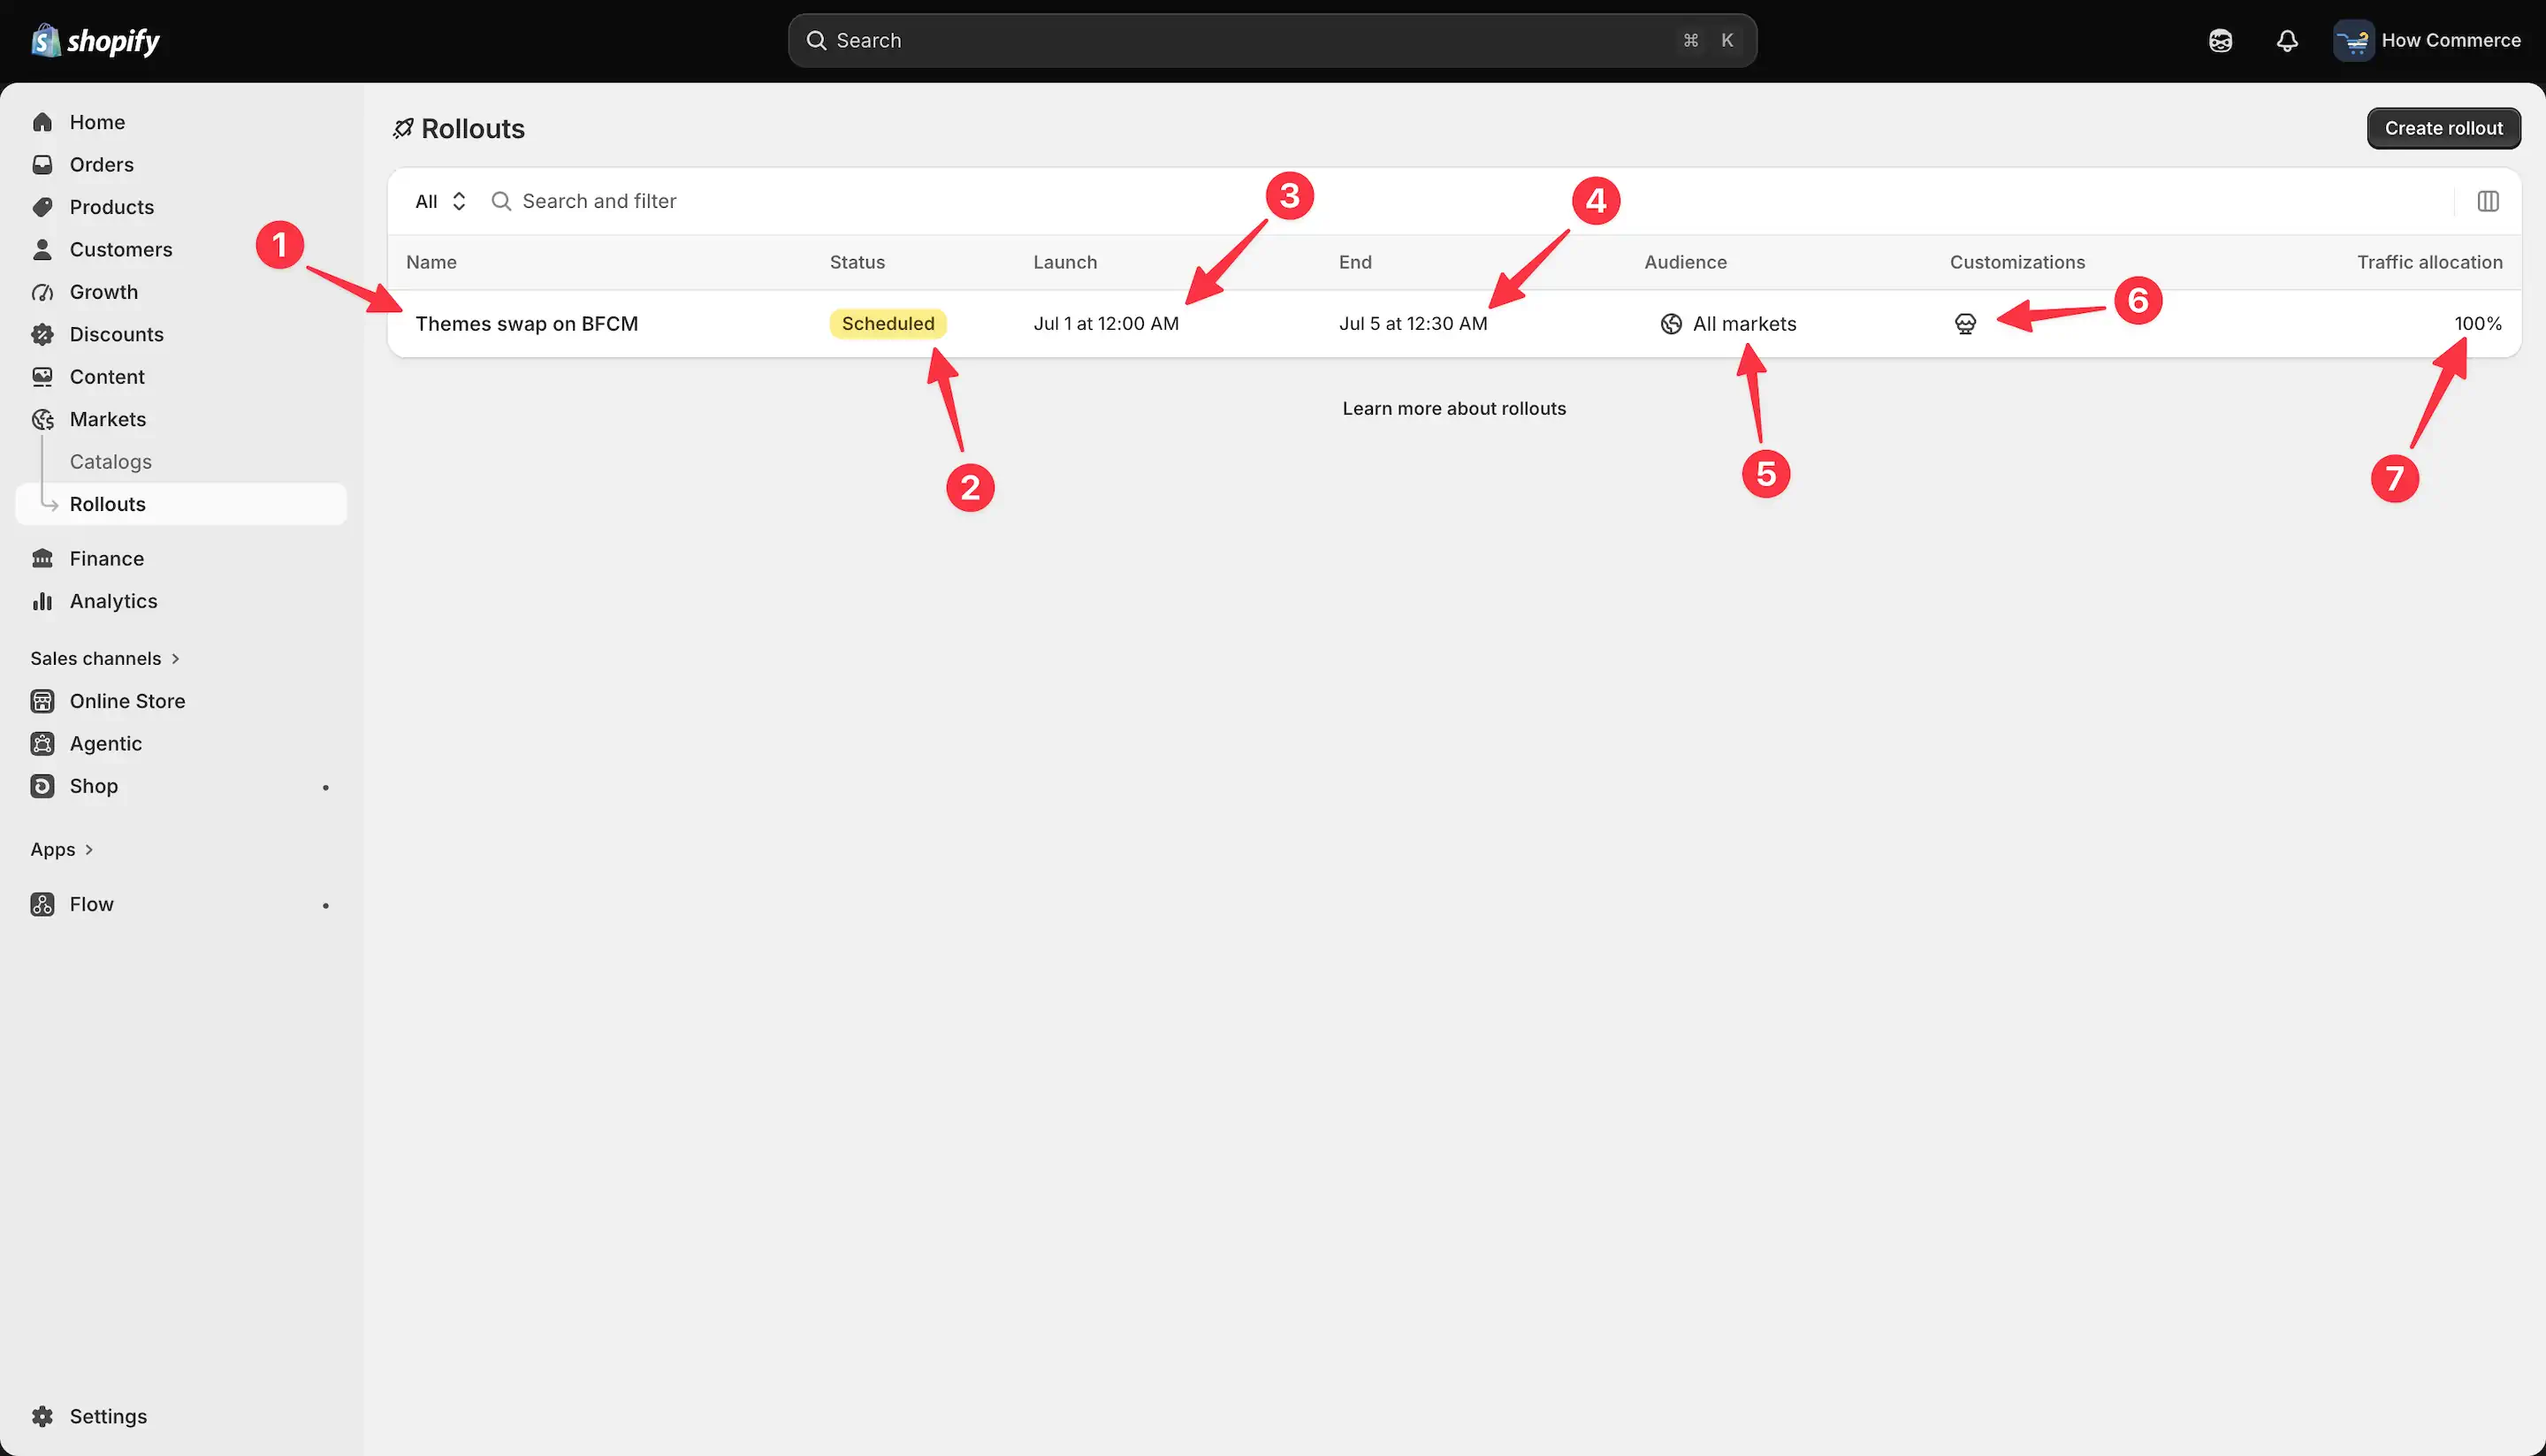
On this page, you can view all your rollouts and their details, including:
- Rollout name (marked with 1 in the image below)
- Rollout status (marked with 2 in the image below). In my example, the status is currently "Scheduled", but it will change once the rollout becomes active.
- Launch date (marked with 3 in the image below)
- End date (marked with 4 in the image below), which determines when the rollout stops running on the storefront.
- Audience (marked with 5 in the image below), showing the markets where the rollout will be available.
- Customizations (marked with 6 in the image below), indicating where the rollout applies and what changes it introduces. In this example, the rollout affects the online store by performing a theme swap that remains active for four days.
- Traffic allocation (marked with 7 in the image below), showing the percentage of visitors who will see the rollout. In this example, the rollout is configured for 100% of visitors.
Before launching, review your changes carefully. Immediate launches and permanently applied rollouts can't be rolled back.
Final thoughts
Shopify Rollouts provide a simple and effective way to schedule theme changes without requiring manual intervention.
Whether you're preparing for seasonal campaigns, product launches, or special events such as BFCM, theme rollouts allow you to automate the entire process and reduce the risk of human error.
In this tutorial, I used a theme swap as a practical example, but Rollouts can also be used for many other types of store updates and experiments. If you're working on multiple theme versions, consider duplicating your theme to create development and staging environments before scheduling a rollout.
Before launching a rollout, always verify your schedule, audience, and end settings to ensure everything behaves as expected.
Testing your changes in advance and reviewing your configuration carefully can help you avoid unwanted surprises once the rollout becomes active.
I hope this tutorial helped you understand how Shopify Rollouts can simplify theme management and make scheduled store updates much easier to handle.